
Foreword
These days, many motherboard manufacturers are opting to include more M.2 slots instead of using those lanes for PCIe slots. Some of the latest Z790/X670 boards even come with as many as 5 M.2 slots. It's unclear why a consumer would need so many M.2 slots, but if you find yourself still left with an extra slot after already populating four 4TB PCIe 4.0 SSDs, consider this dual port 2.5GbE NIC from IOCREST as a useful addition to your system.
IOCREST makes a range of M.2 form factor NICs, here are a few useful links in case you are interested in purchasing one yourself. DISCLAIMER: I DO NOT BENEFIT FROM YOUR PURCHASE.
M.2 GbE Single (A+E Key as in WiFi modules, Realtek 8111H)
M.2 GbE Single (B+M Key as in SSDs, Realtek 8111H)
M.2 GbE Single (B+M Key, Intel i210)
M.2 2.5GbE Dual (B+M Key, Realtek 8125B, featured in this review)
M.2 2.5GbE Single (B+M Key, Realtek 8125B)
M.2 2.5GbE Single (B+M Key, Intel i225)
Mini PCIe GbE Dual (Mini PCIe, Realtek 8111H)
Mini PCIe 2.5GbE Single (Mini PCIe, Realtek 8125B)
Mini PCIe 2.5GbE Dual (Mini PCIe, Realtek 8125B)
Build and Form Factor
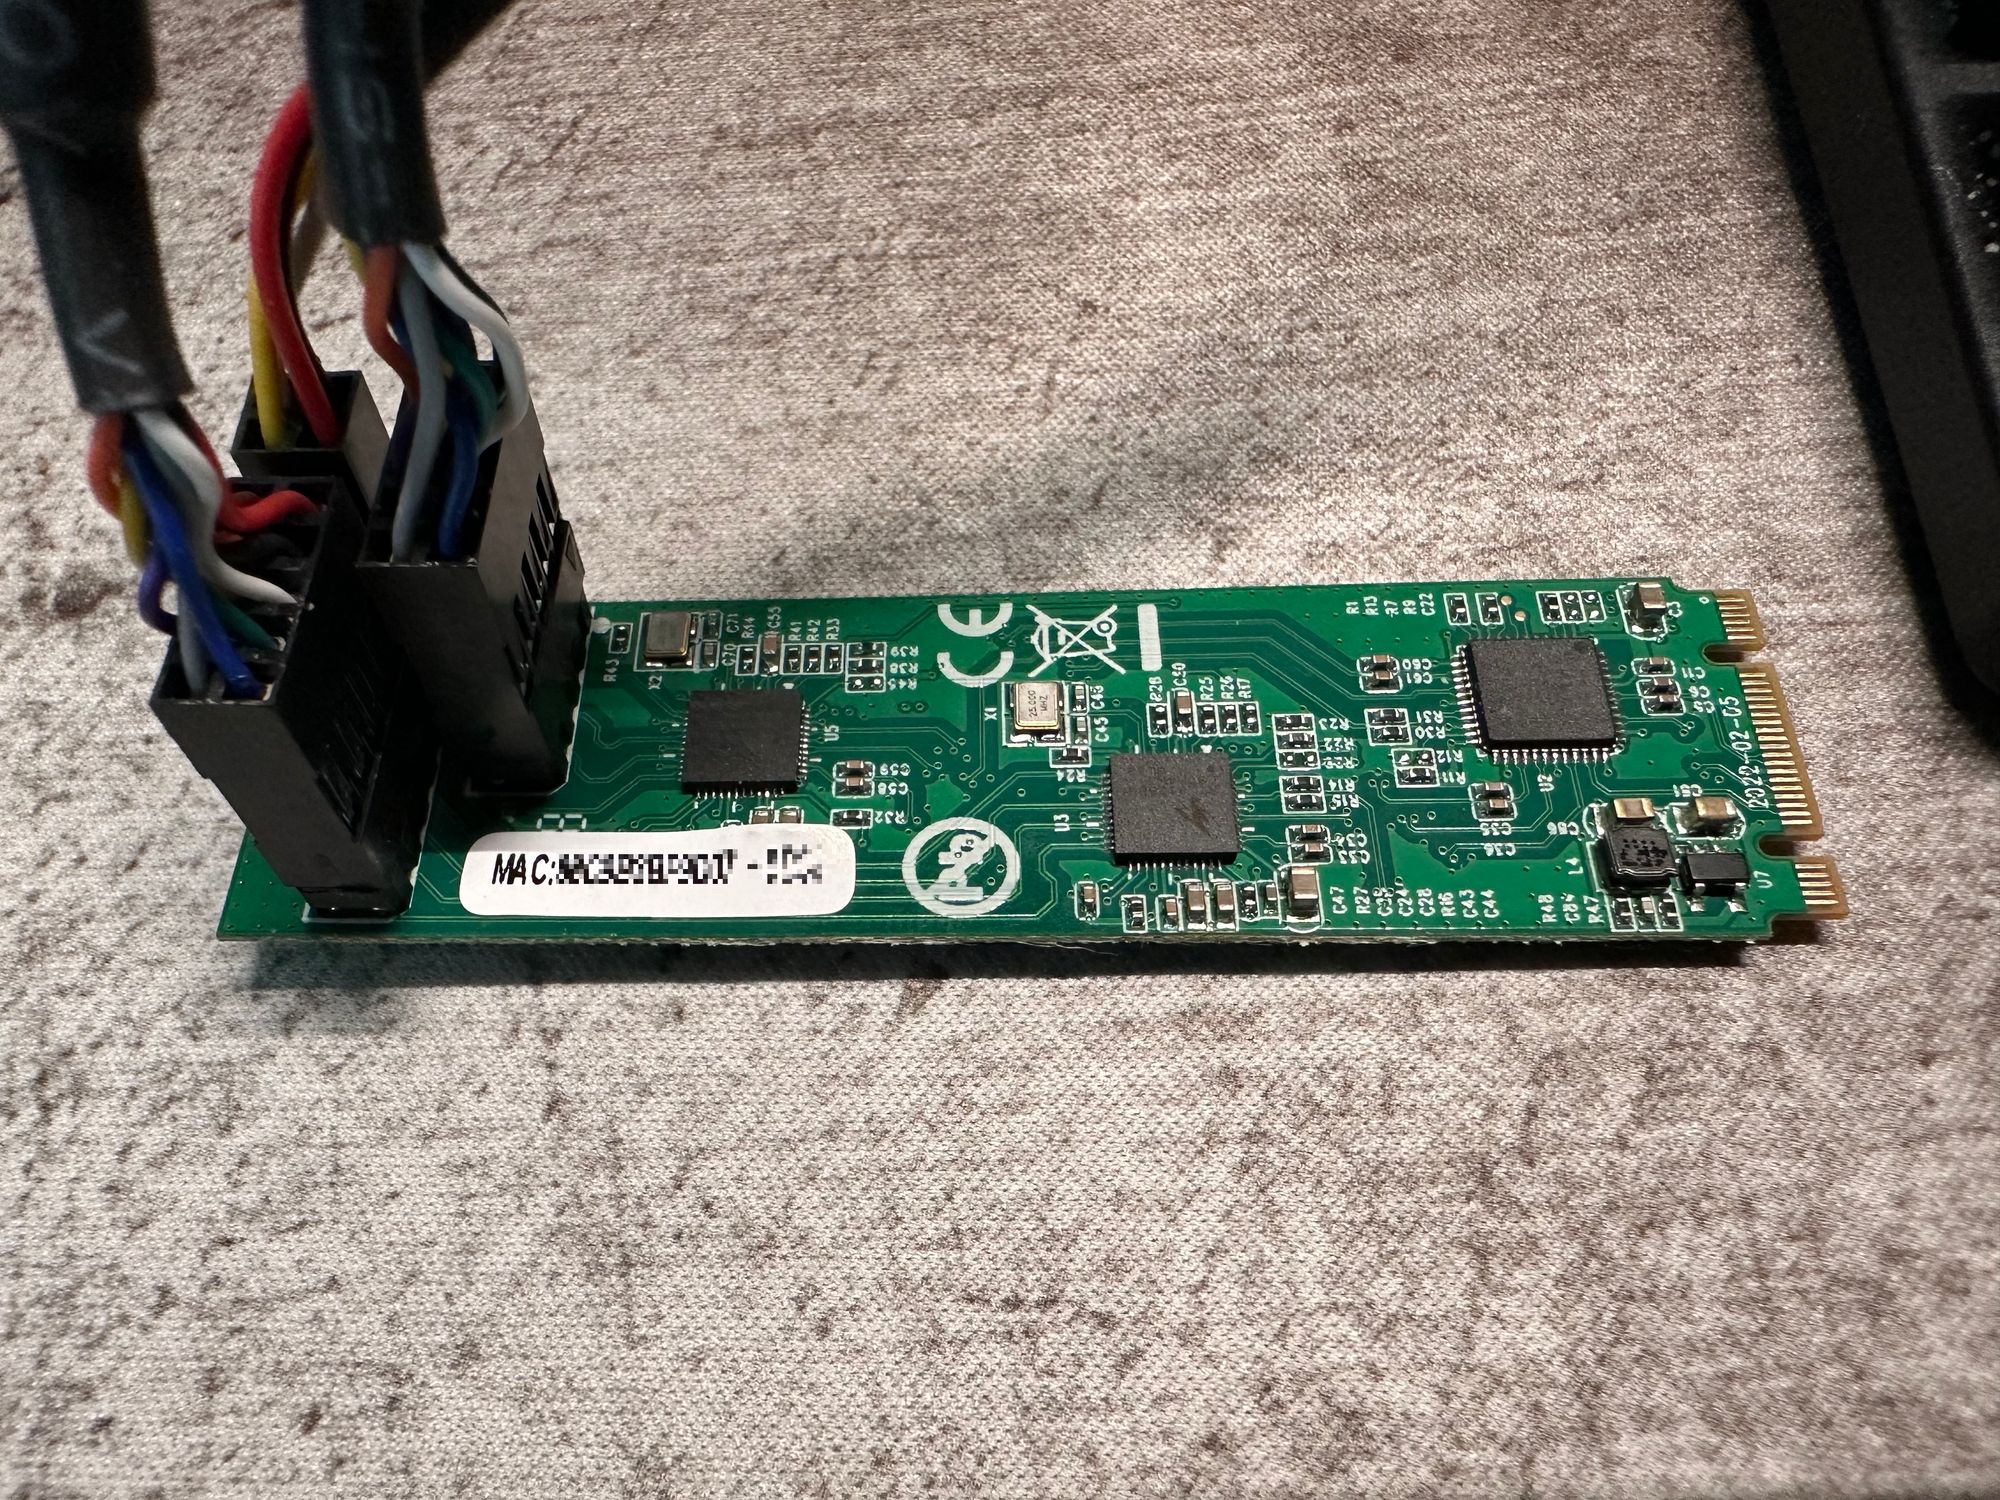
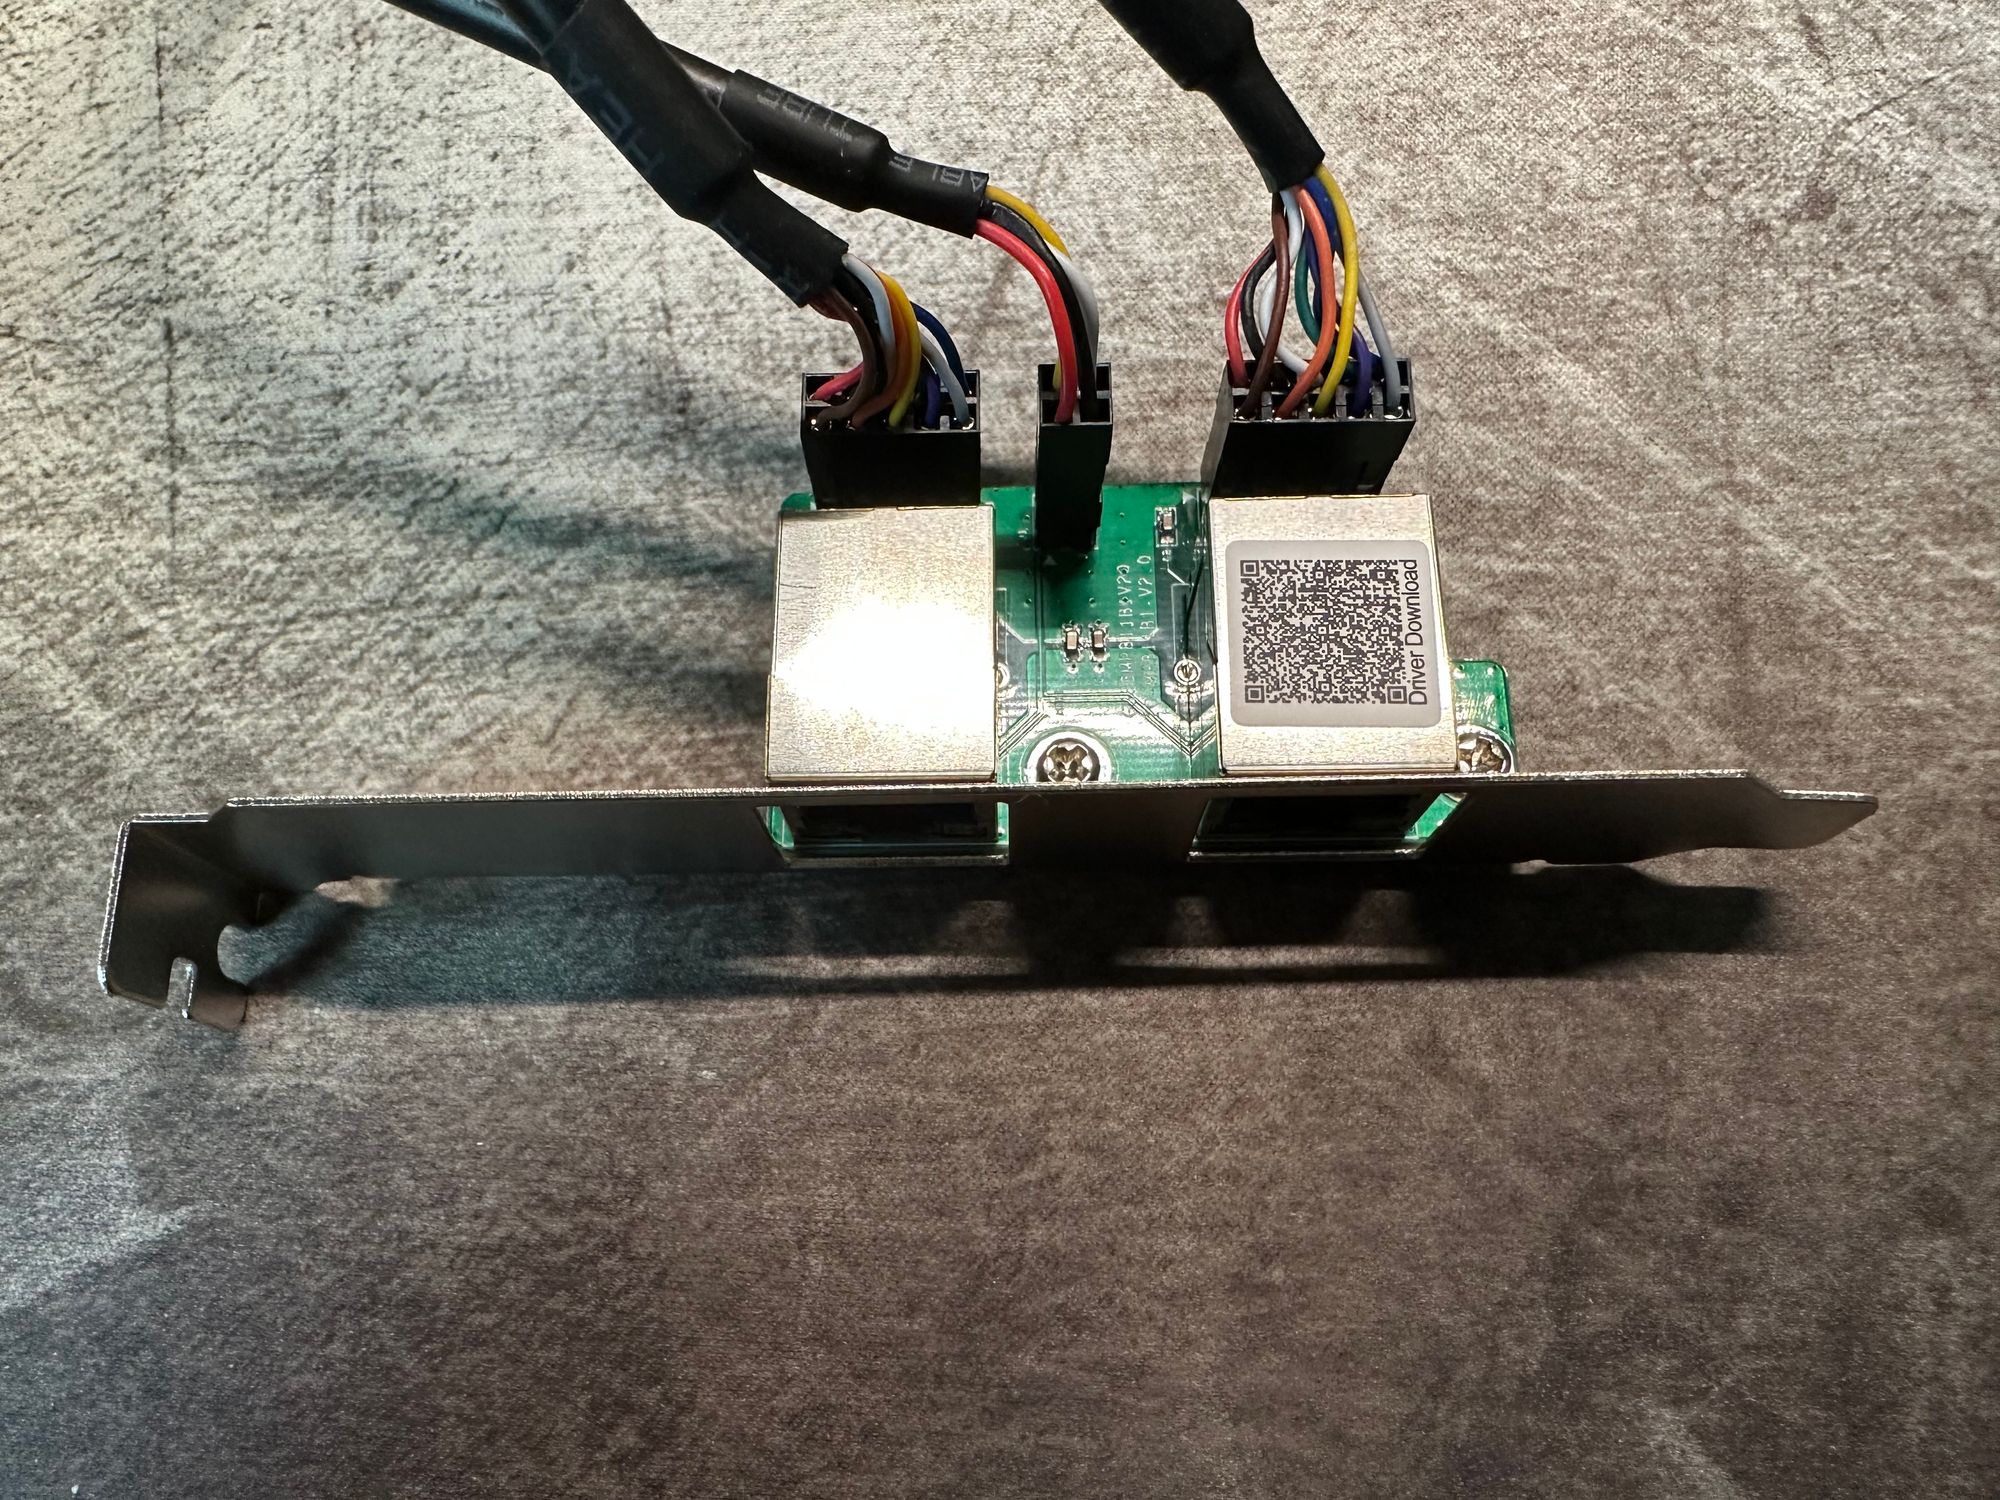
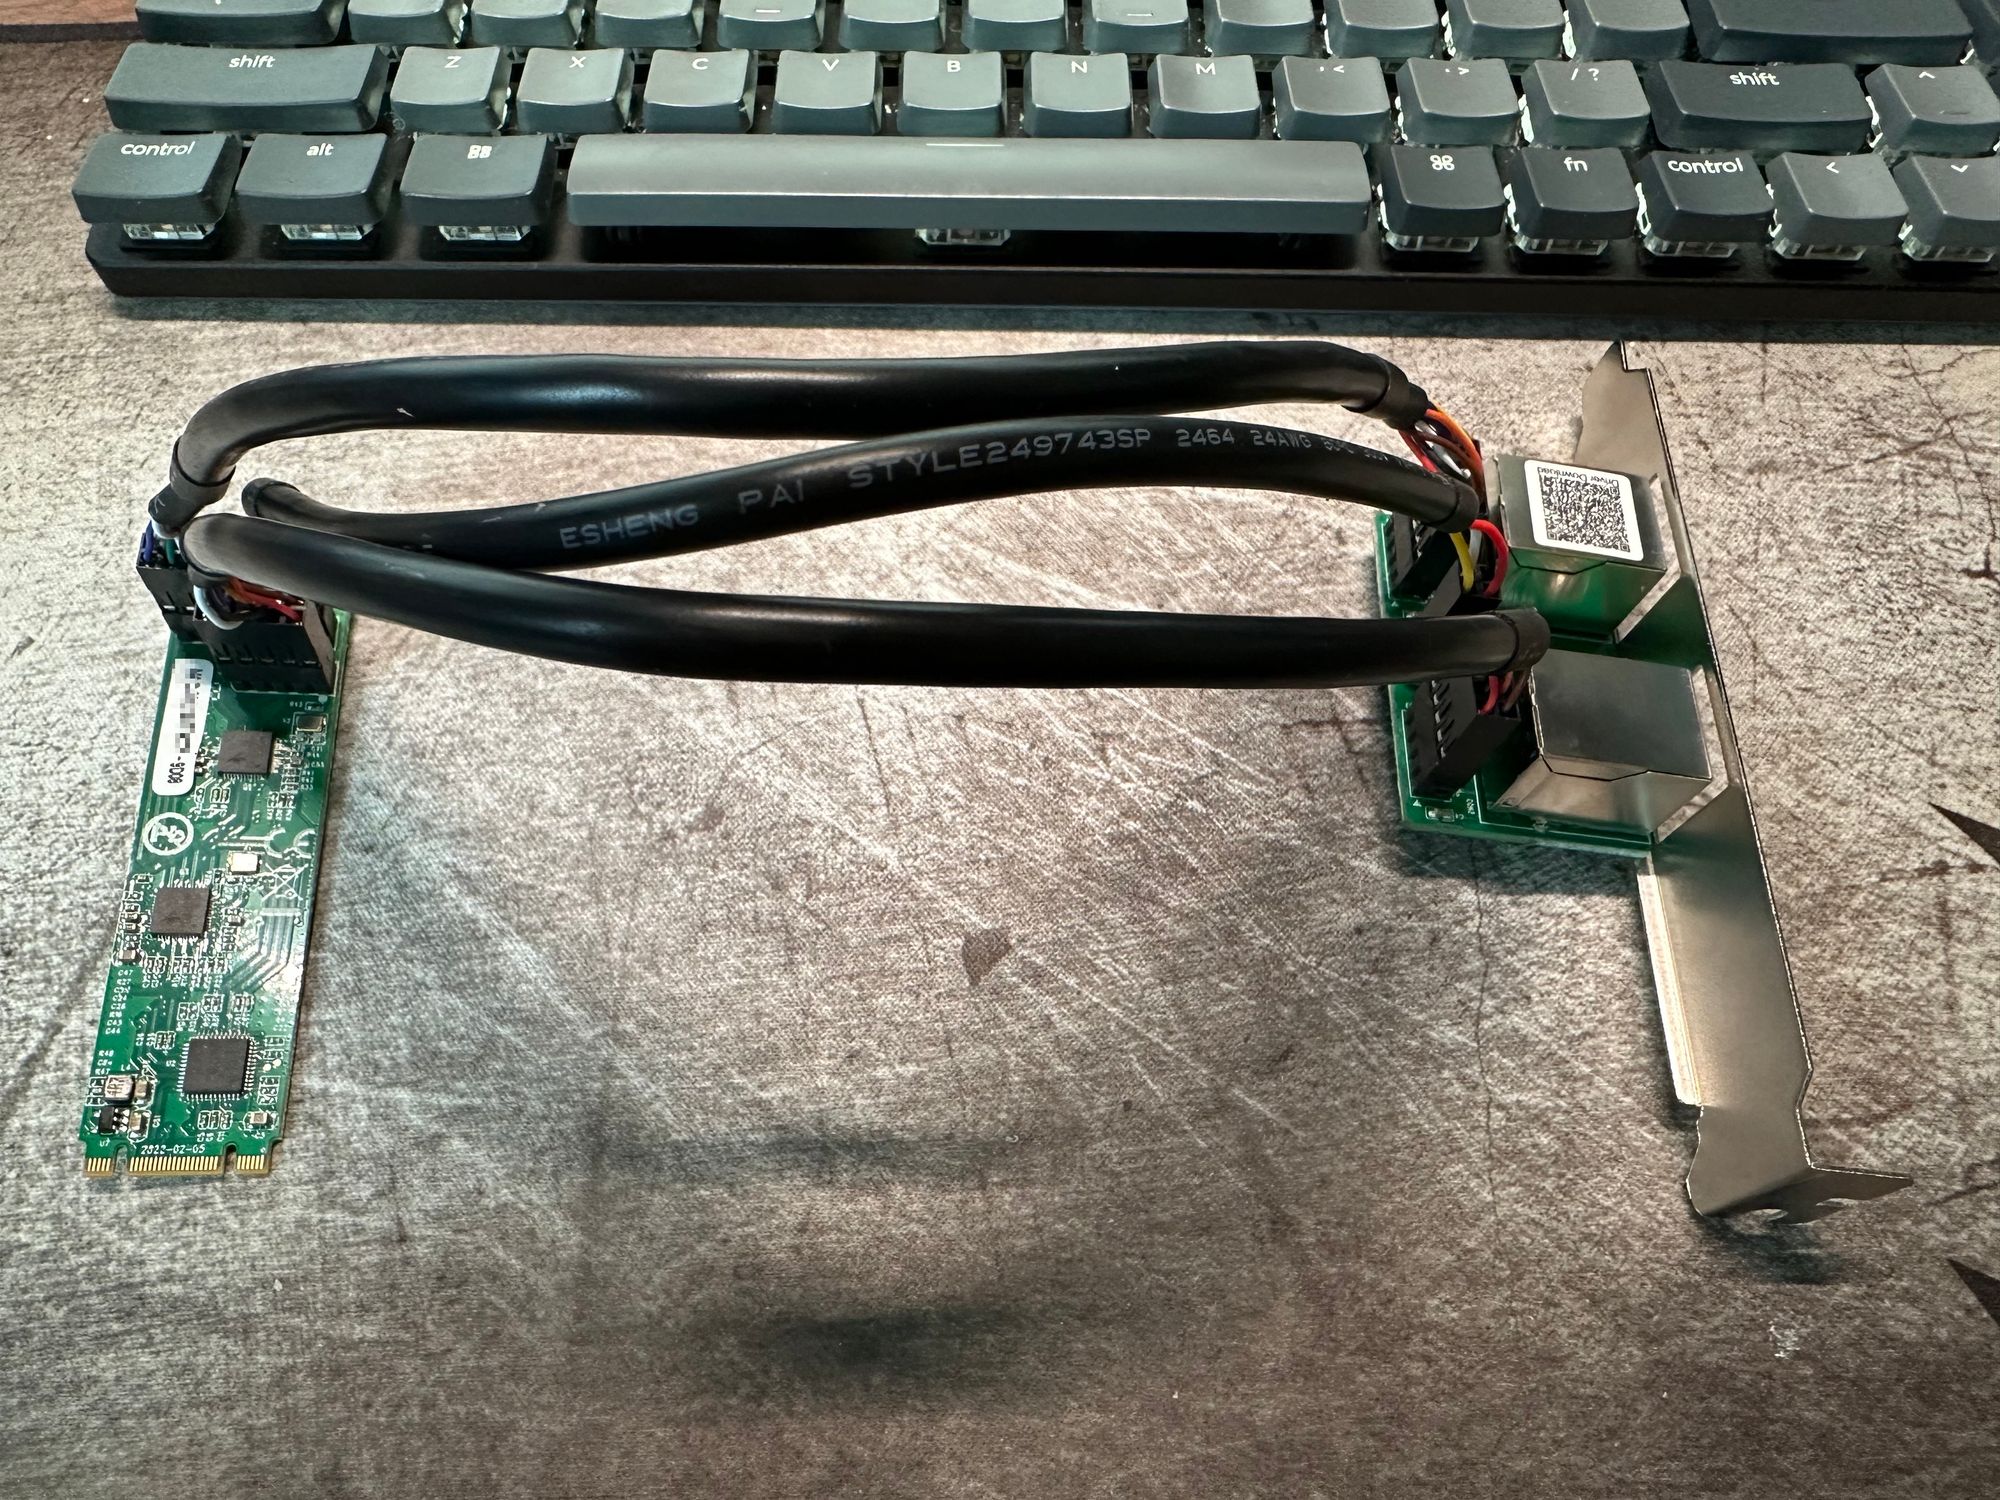
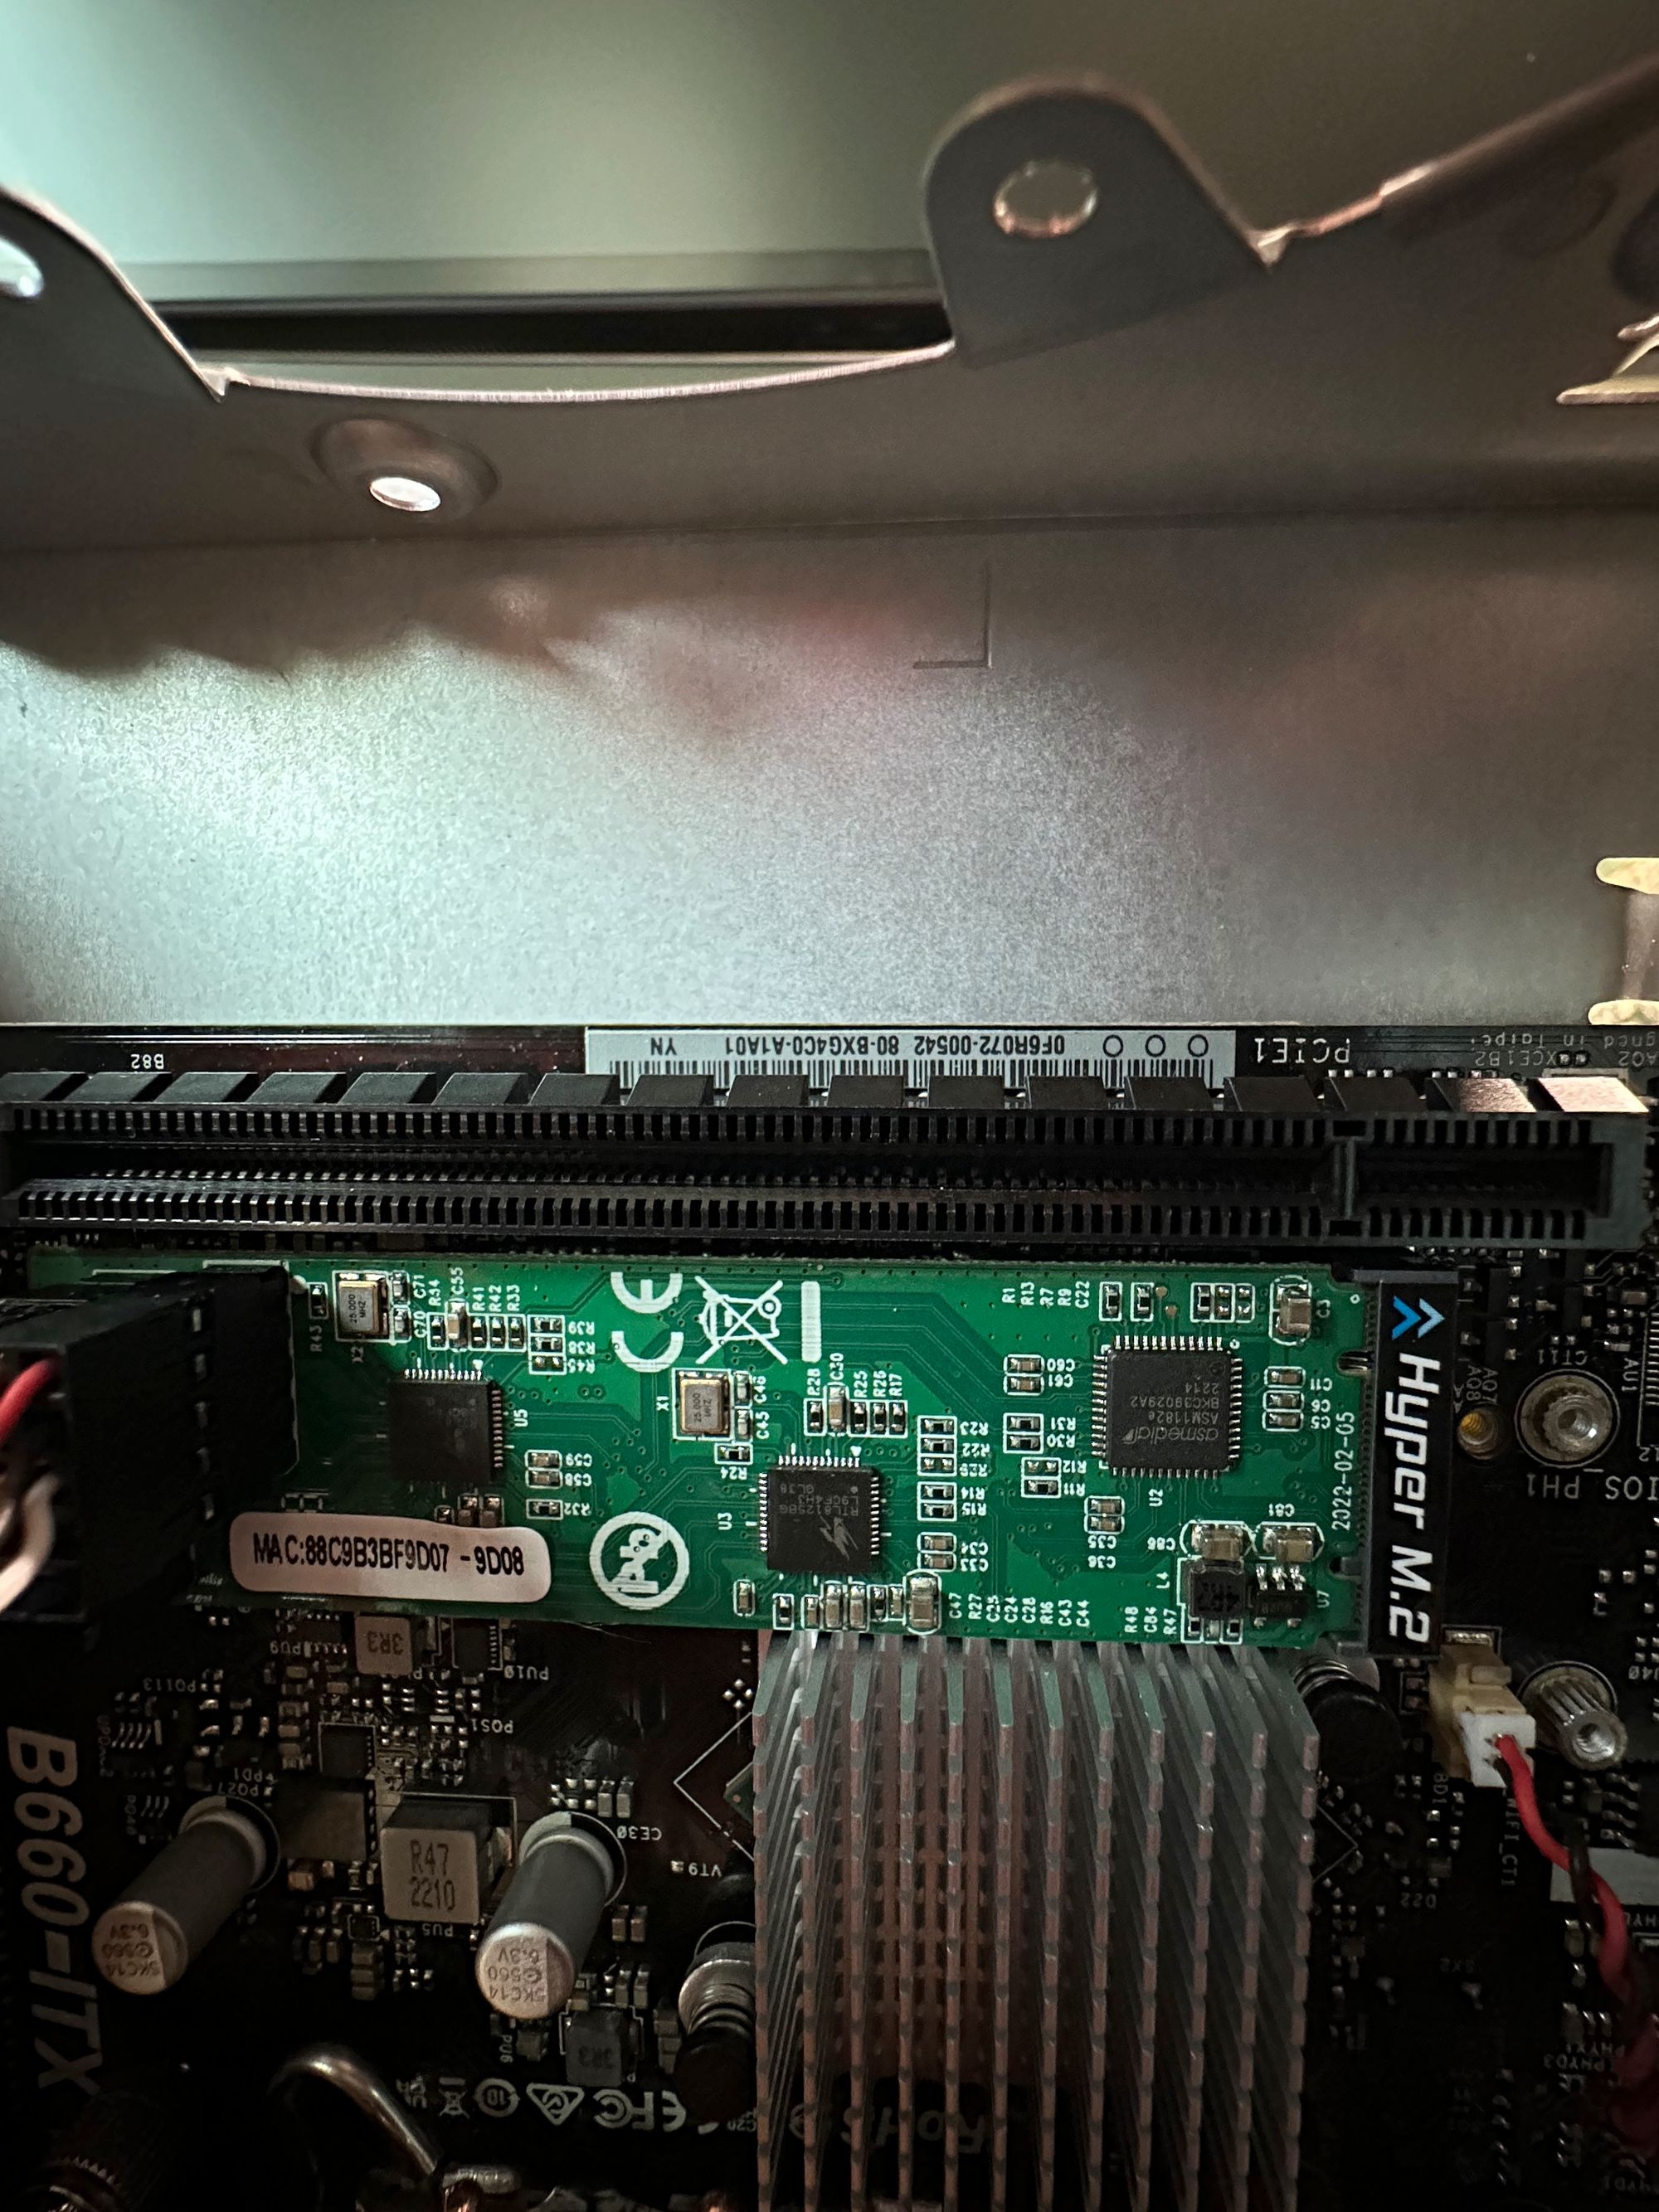
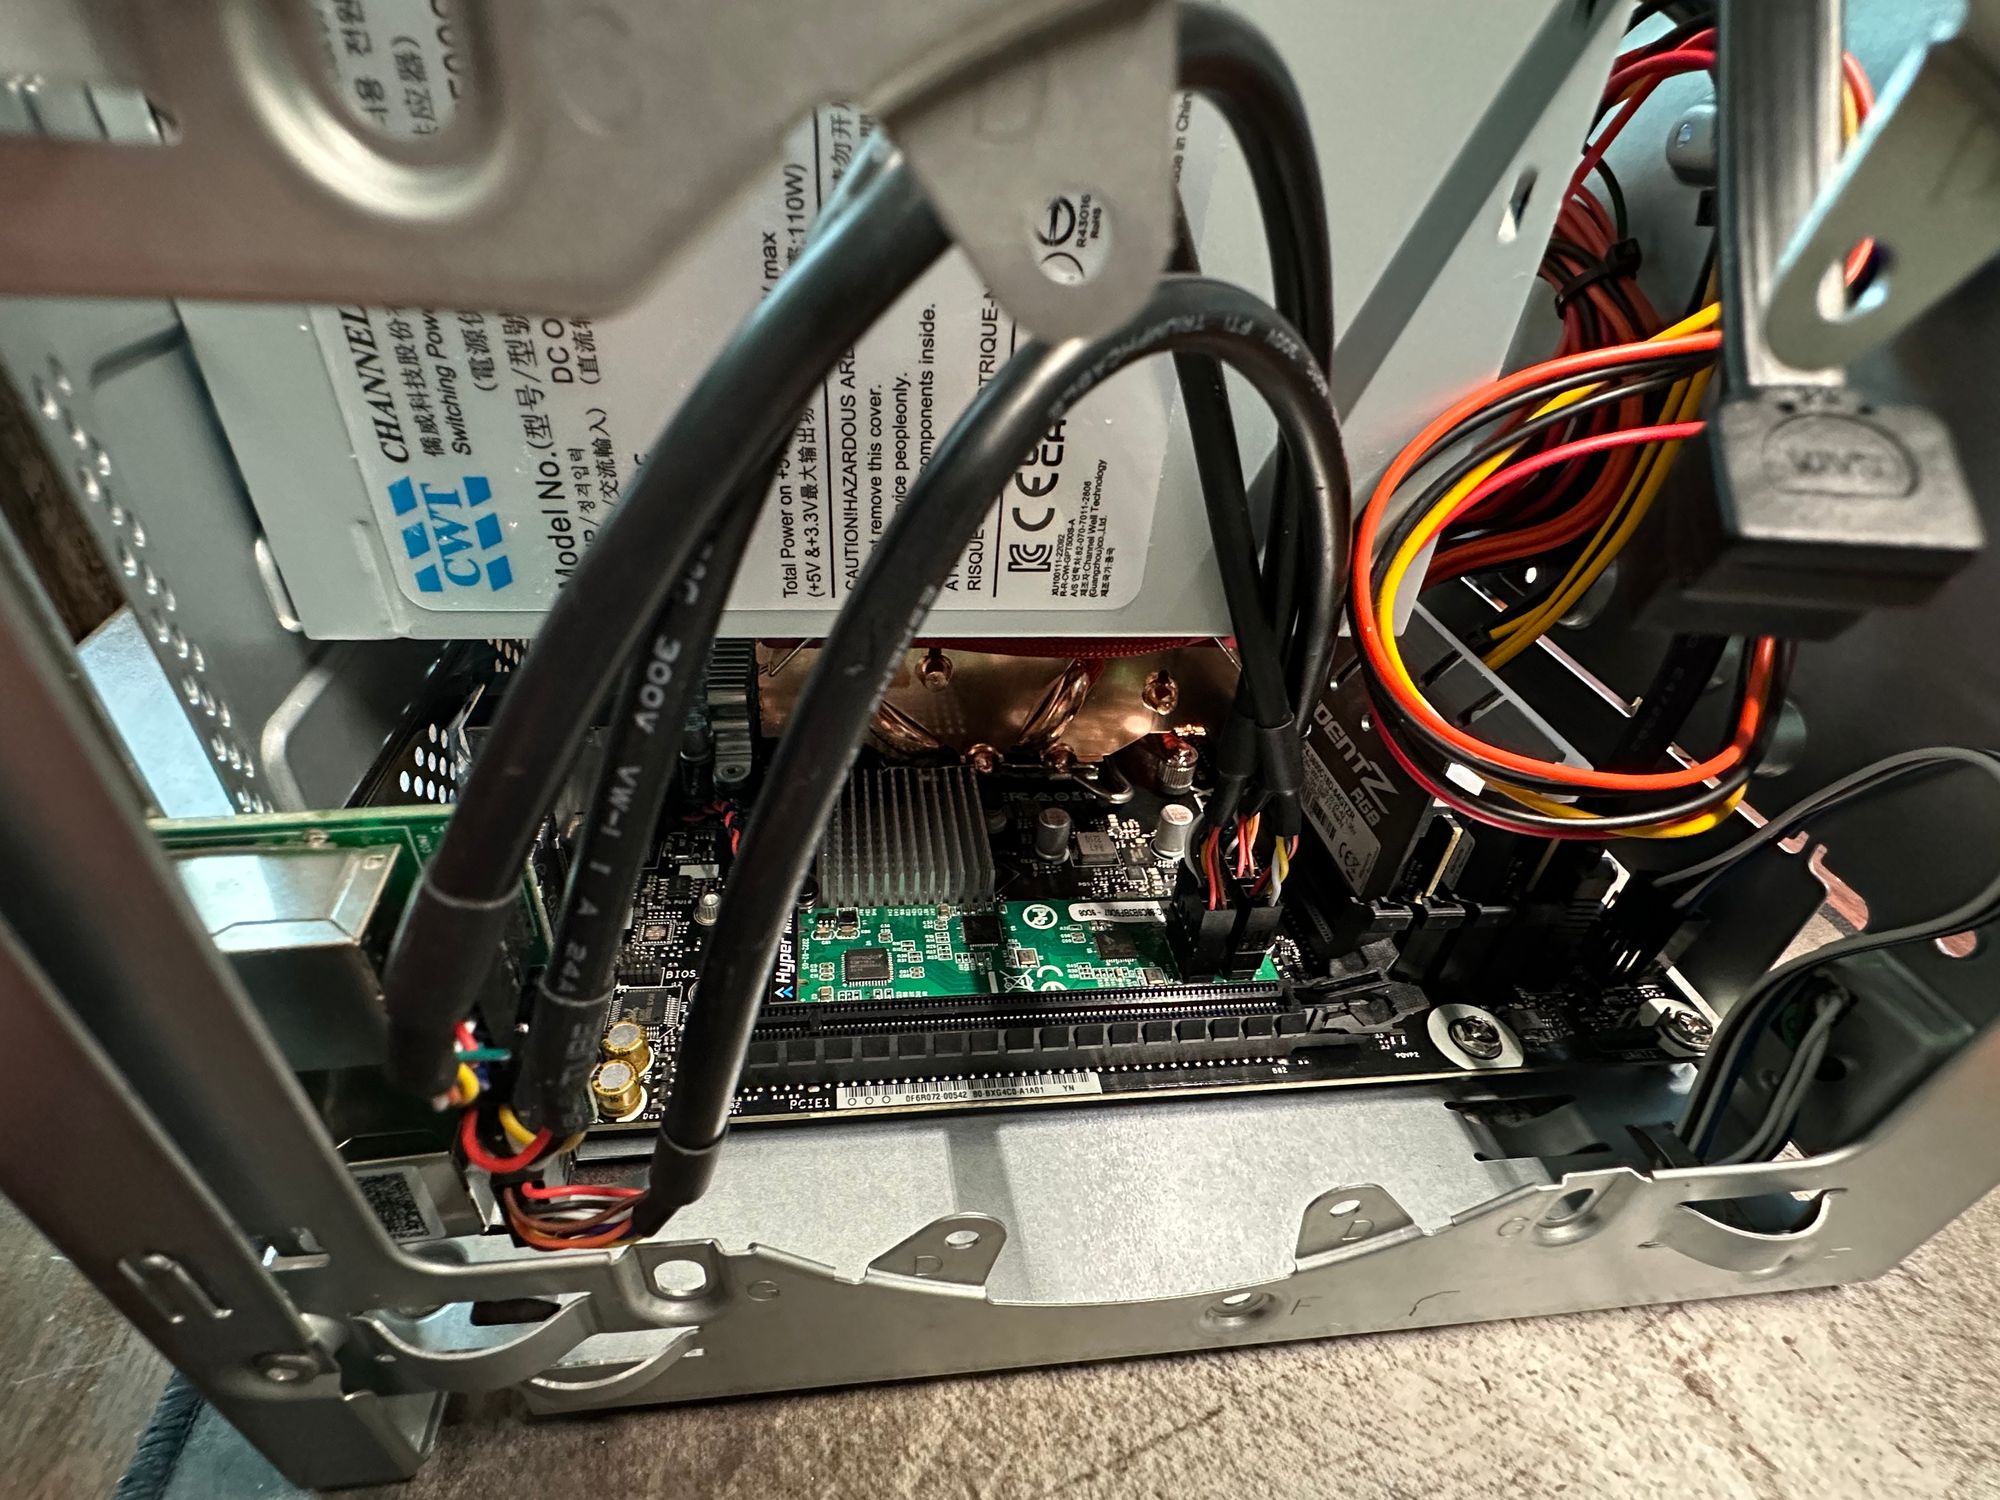
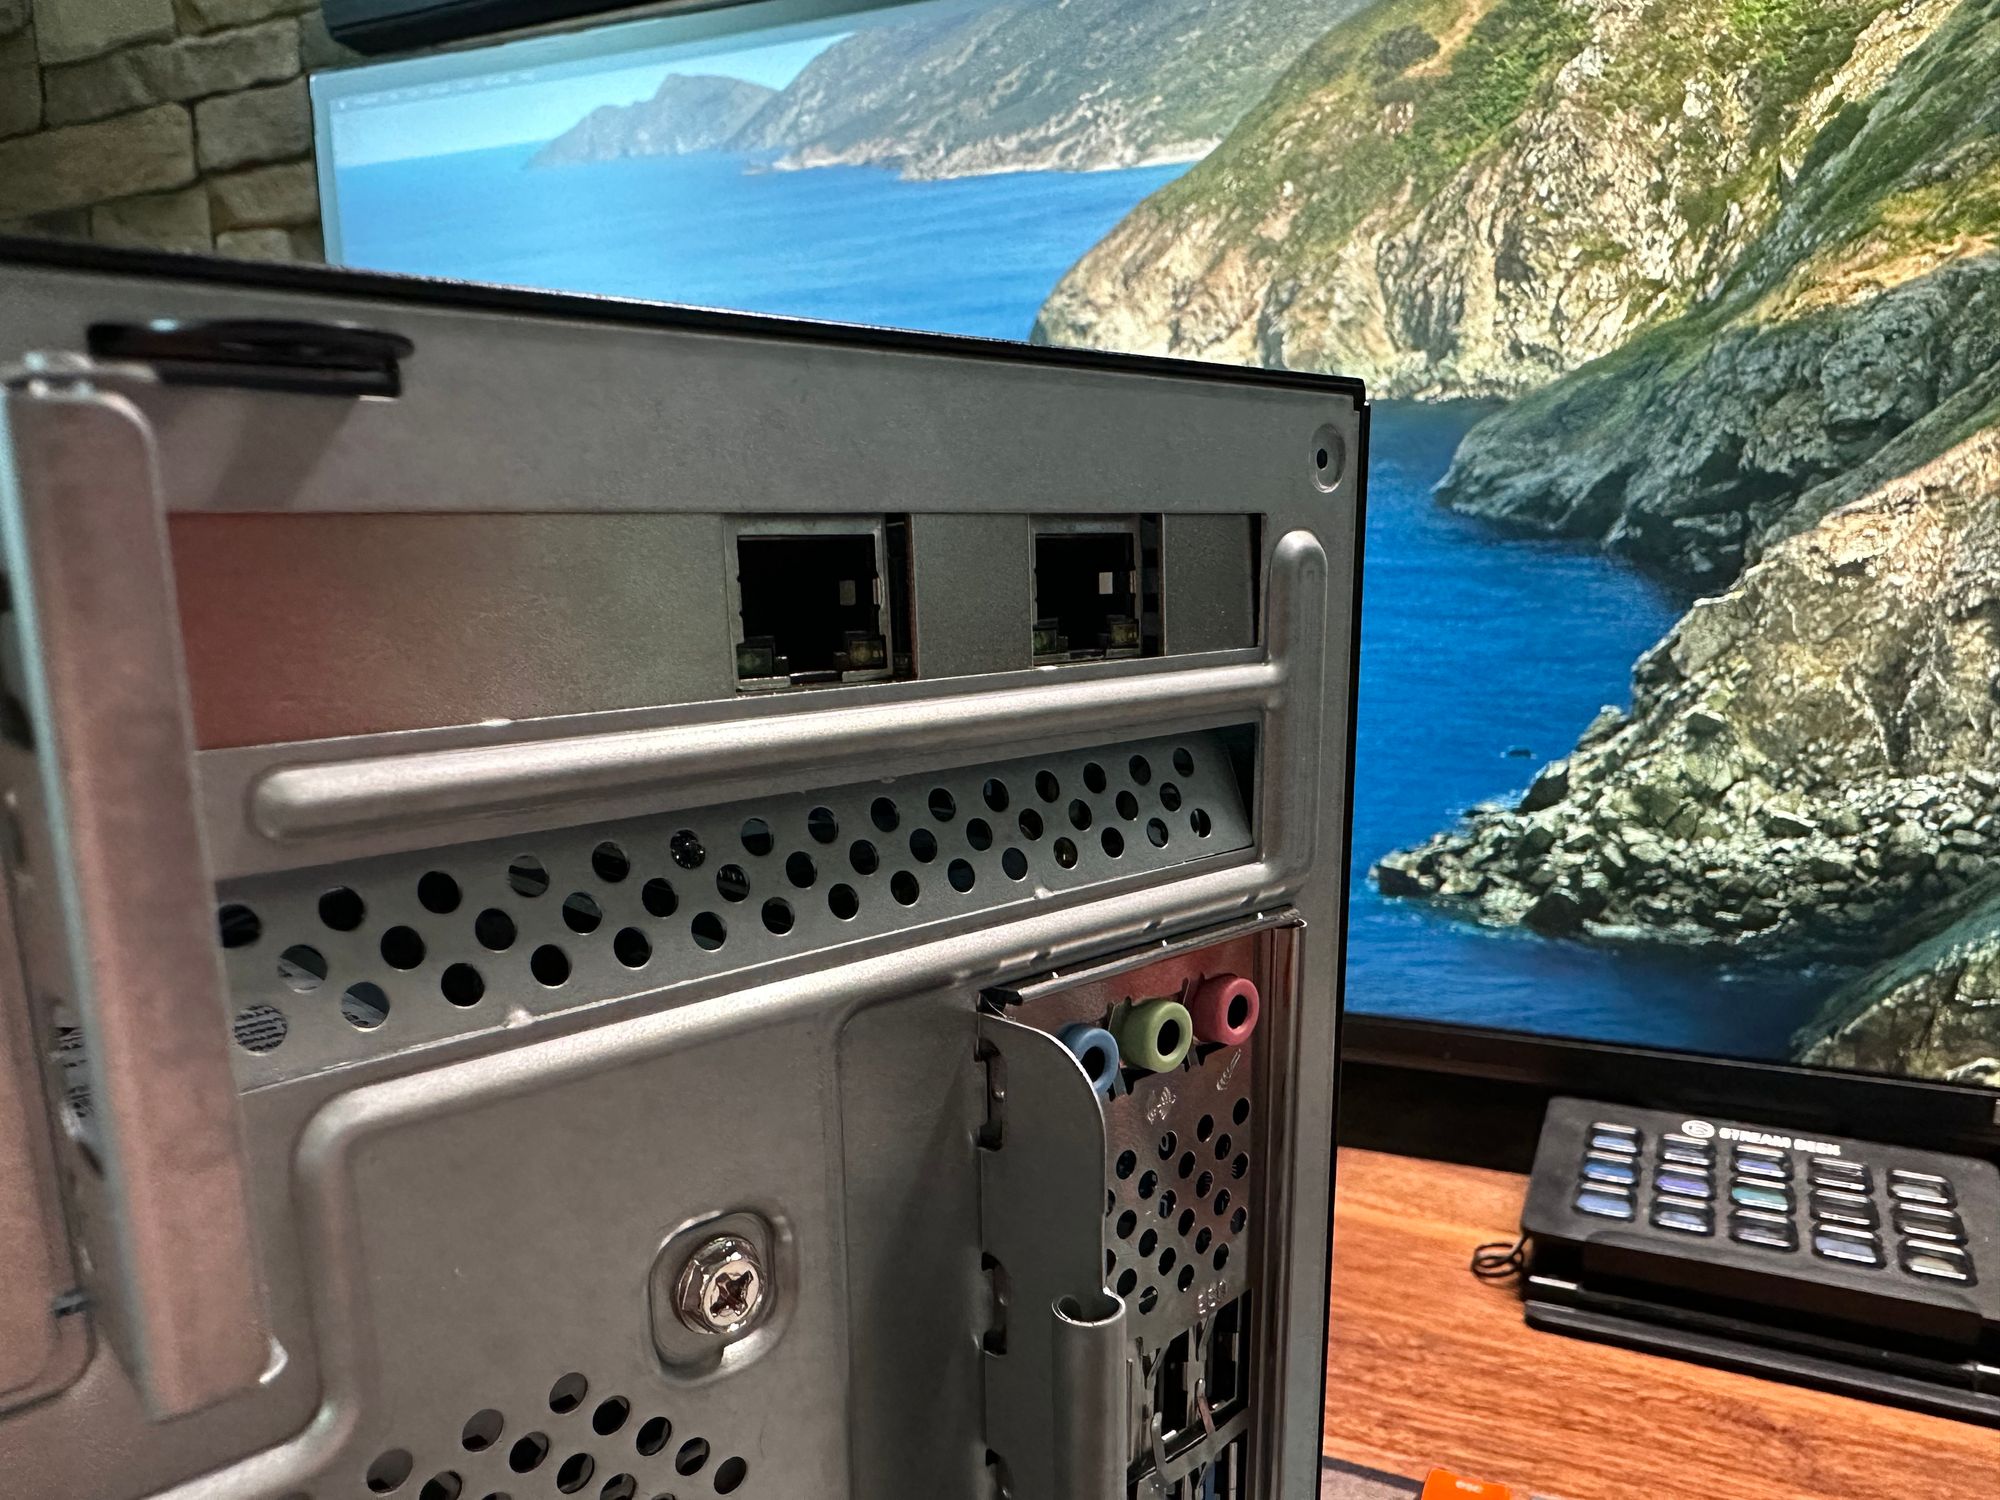
The IOCREST M.2 NIC uses a M.2 B+M Key form factor, with PCIe 2.0 x1 interface via an ASM PCIe switch to deliver a 5Gb/s transfer speed to its two Realtek 8125B chips. It comes with three sets of leads, each connected to a pair of hefty cables that run to the breakout board, where you'll find the two ethernet ports. IOCREST even provides a low-profile bracket for those with space-constrained SFFPCs.
Although I was skeptical at first about how two 2.5GbE can run at full speed (294 MB/s each) while only having one PCIe 2.0 link for 400 MB/s max of effective bandwidth, I was assured by IOCREST’s engineer that by using a PCIe switch, there won’t have any noticeable performance loss for these NICs. This will later be evidenced by the performance tests.

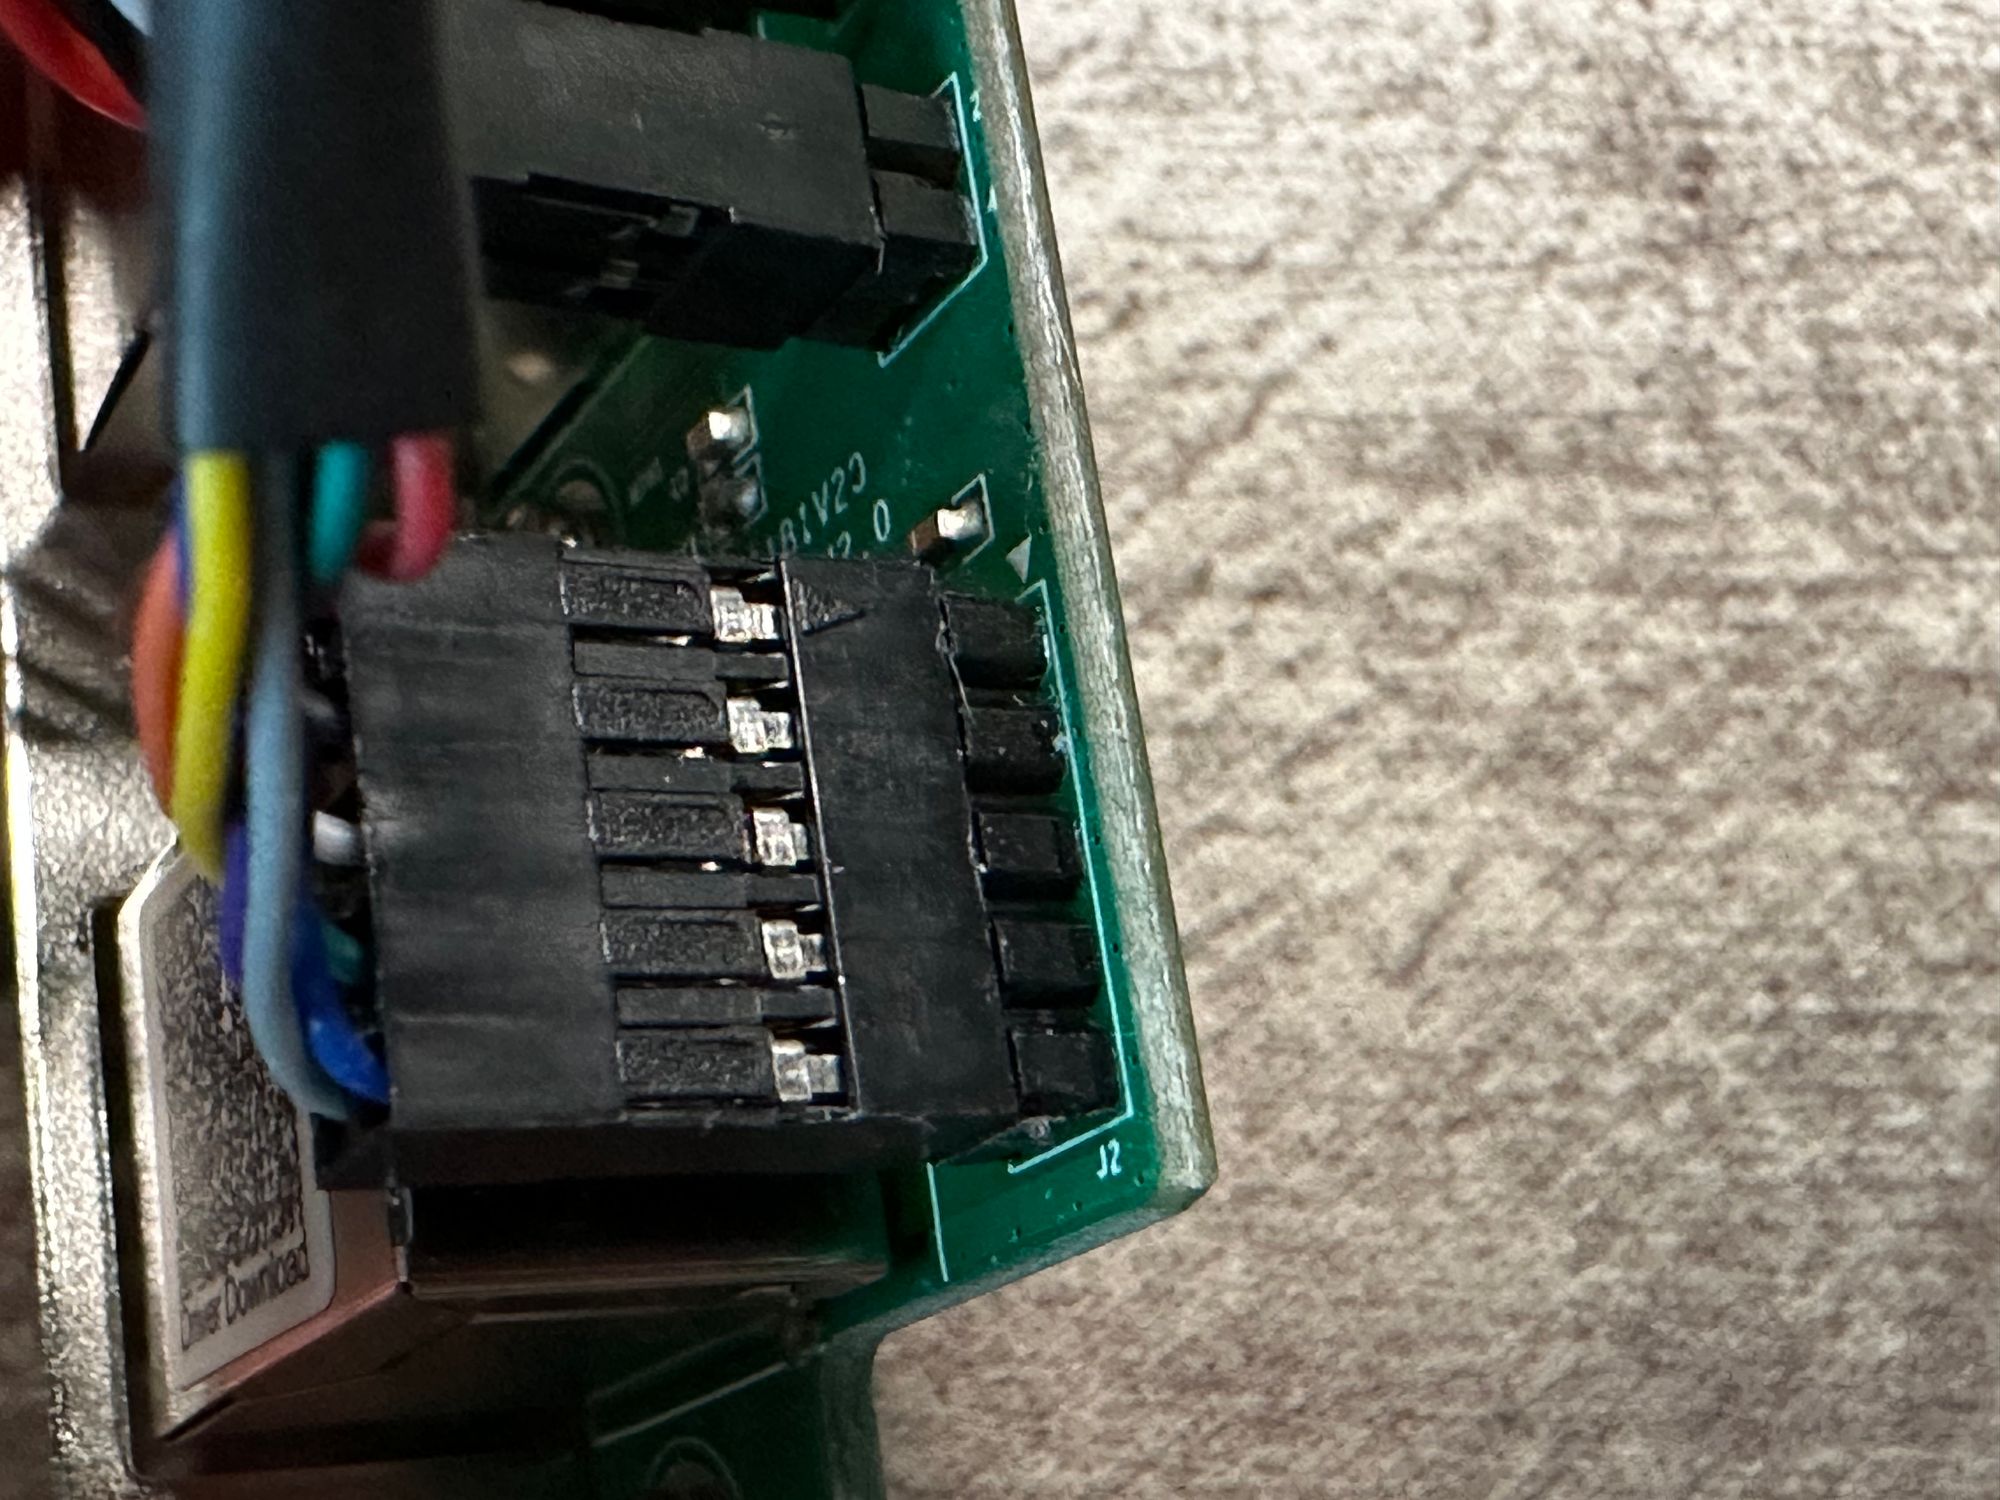
Installation is straightforward. Connect the leads to the breakout board with the three provided cables, ensuring the cables are oriented correctly by matching the board's indicator to the connector. Then, insert the M.2 board into a PCIe slot that supports PCIe (not SATA) and secure the breakout board to the PCIe brackets in your case.
While true 2.5GbE with 5% overhead delivers about 294 MB/s transfer speed, some may be tempted to use Jumbo Frames (MTU > 1500 or set to 9000) to reduce overhead. However, in our tests, we used a standard 1500 MTU to reflect the NIC's out-of-the-box performance with minimal tuning.
Compatibility
The Realtek 8125 family has a strong reputation in the 2.5GbE era. While the first revision suffered from some instability issues, Realtek quickly released the 8125B, which addressed all the problems. Meanwhile, Intel is still grappling with its i225/226 2.5GbE NIC, and there's no clear resolution in sight.
I'll be using this NIC with Proxmox 7 and kernel version 6.2. However, in my previous review of the IOCREST PCIe x1 Dual Port 2.5GbE NIC, I found driver support on both Windows and Linux to be worry-free. This M.2 NIC uses the same chipset as the PCIe x1 one, so they should perform similarly in terms of speed and reliability. For those using OPNsense or pfSense, an additional driver is needed.
Performance Testing
In my last review of the Asrock DeskMeet B660, I noted that it only had one 1G ethernet port, which was disappointing. Using one of these M.2 NICs, I can repurpose one of the two M.2 slots for a dual 2.5GbE connection. Admittedly, it feels wasteful to use a PCIe 4.0 x4 M.2 slot for a PCIe 2.0 x1 device, but there isn't a PCIe 4.0 x4 M.2 dual port 10GbE NIC available. While PCIe 3.0 x4 M.2 10GbE NICs do exist, they often only have one RJ45 port and are prohibitively expensive, so it's not a practical option.
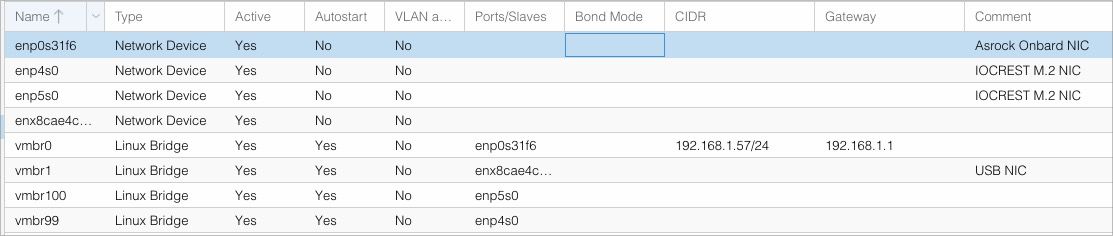
A quick lspci in Proxmox console revealed that we have two Realtek RTL8125 Rev.05 NICs, which is as expected.

Next up, we will evaluate this NIC in a router configuration, utilizing both ports in an VyOS VM with two configurations:
A. Proxmox Linux Bridge for both ports for VyOS VM
B. Hardware Passthrough to VyOS VM
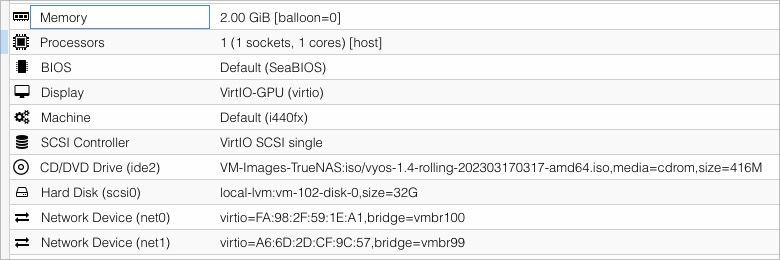
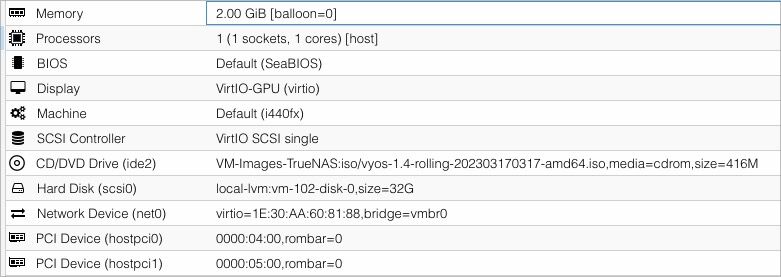
I’ll assign one CPU core, 2GB of RAM to the VyOS VM.
In order to facilitate the tests, I’ve also added an USB 3.0 RTL8156B 2.5GbE NIC from Asustor which I’ve reviewed here. It will be bridged for the test client - a Windows 11 VM - to run on.
Configuration A - Proxmox Linux Bridge
In this configuration, the two Realtek NICs will be paravirtualized by creating a Linux Bridge in Proxmox. As configured, they are using vmbr100 and vmbr99 as bridge IDs.
In the VyOS VM, I used the created bridges to configure the network interfaces. Since the WAN interface always gets its IP address from my DHCP server and the LAN interface is switched by my 2.5GbE switch, it doesn't matter which bridge is designated as LAN or WAN in this test configuration. However, in a production environment where the WAN interface is facing outside world, we should identify these interfaces correctly before bringing them online.
After booting up VyOS in a live environment, we’d need some initial configuration. If you are familiar with Cisco, Brocade or Ubiquiti CLI, you’ll feel right at home.
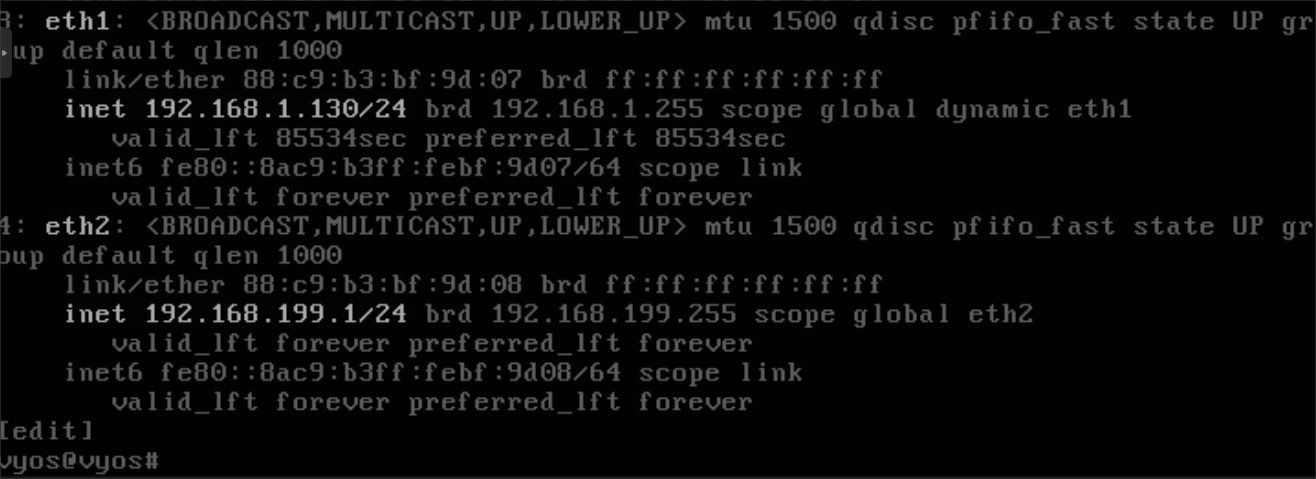
ip a - to find all available NICs identified by name such as eth1 eth2
configure - go into configuration mode
set interface ethernet eth1 address dhcp - I will use eth1 as the WAN interface so it needs to get its IP address from upstream DHCP server.
set interface ethernet eth1 description 'WAN' - Give it a name that’s easy to identify.
set interface ethernet eth2 address '192.168.199.1/24' - This will be the LAN interface.
set interface ethernet eth2 description 'LAN' - Same as before, just on the LAN side.
set nat source rule 100 outbound-interface 'eth1' - Tell VyOS to use eth1 for outbound NAT interface.
set nat source rule 100 source address '192.168.199.0/24' - This would allow the subnet 192.168.199.0/24 to make requests to the outside world, that is anything outside of 192.168.199.0/24 subnet.
set nat source rule 100 translation address masquerade - Enabling ‘masquerade’ so all clients can share one public IP, very standard practice.
commit - Commit the changes
save - Save the configuration file. This will not persist if VyOS is in live environment, it will only “save” when the VyOS is installed.
The WAN interface has successfully obtained an IP address from my DHCP server, as you can see from the screenshot. Additionally, I manually configured the LAN interface to use an address range of 192.168.199.0/24, with the virtualized router being assigned the IP address 192.168.199.1 manually.
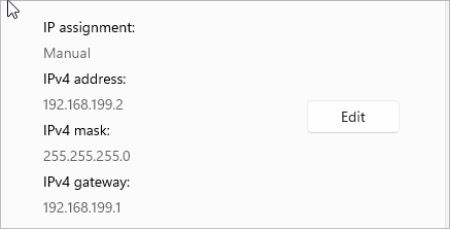
Next, I prepared an iperf3 server on my main compute node, which is connected to my core switch with 40GbE connection. Then, I assigned the bridge with the USB 2.5GbE NIC to a Windows 11 VM with the IP address of 192.168.199.2.
So, ideally, the network packets will be initiated from the Windows 11 VM, through the USB 2.5GbE NIC, to one of the Realtek 2.5GbE M.2 NIC, then gets routed to the other Realtek 2.5GbE M.2 NIC, to my core L3 switch, then finally landing at the iperf3 LXC that's running on my compute node with a 40GbE connection to the core switch.
Let’s take a look at the performance. First off, just a simple bandwidth test:
iperf3 -c [iperf3 server IP] -t 30
It gets about 1.90 Gb/s, acceptable performance, but not quite at 2.5GbE speeds.

Next, let’s see if multiple streams will be any different.
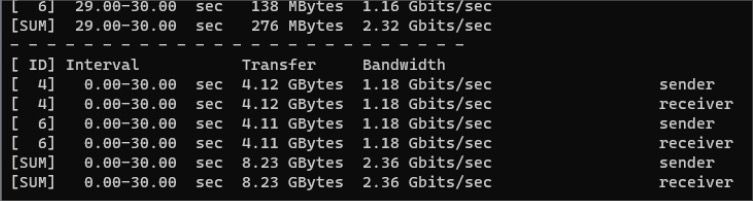
As one would expect, adding an extra stream boosted the throughput up against the ceiling of a 2.5GbE connection, which means both the system and the IOCREST M.2 NIC can handle traffic at 2.5GbE with ease.
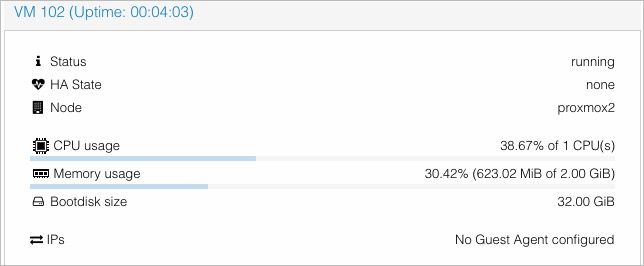
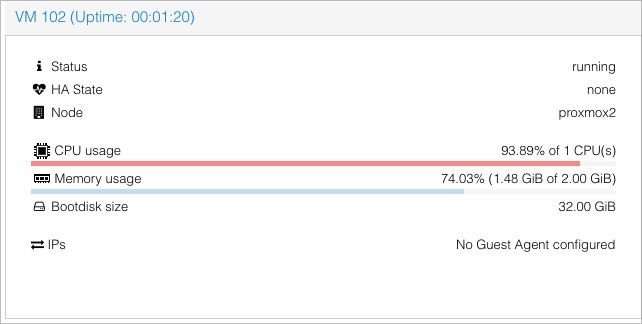
During the single stream benchmark, the VyOS CPU usage topped at about 40%.
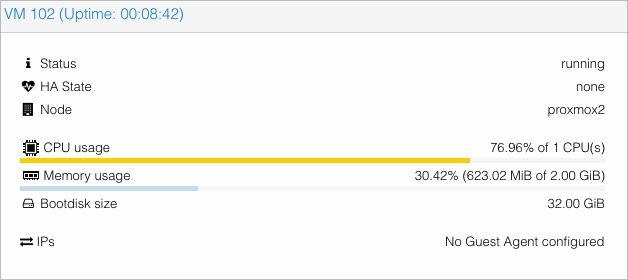
For two streams, the VyOS CPU usage reached about 80%.
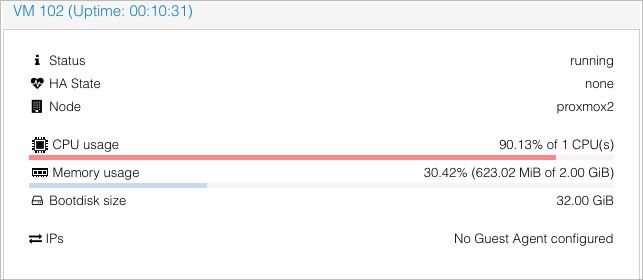
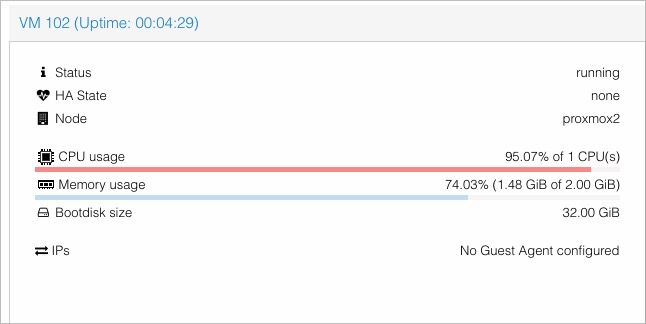
For the sake of experiment, I ran a test with four streams. This time, CPU usage is approaching 95%.
So, in a multi-client environment, it is best to allocate more CPU to the VM. I believe four cores would be adequate for supporting a user base of 15-20 people if bandwidth limits are applied.
So, IOCREST was right. The only way to achieve such a result will be that both NICs are running at their maximum bandwidth, so that even routing between two subnets, the bandwidth is still a steady 2.35Gbit/s.
Configuration B - PCIe Passthrough
I’m quite delighted to report that VyOS does not need any special driver in order to operate the Realtek 8125 NICs. The VyOS version I am using comes with Linux Kernel 6.1.19 which has the Realtek drivers built-in.
Then, shutdown the VM, and configure PCIe passthrough for the two NICs.
Boot the VM, and repeat the steps above to configure NICs and routing.
Now, we would run iperf3 again, but this time, since the hardware is passed directly to the VM, it should improve in performance since no translation is needed.
As seen, we only needed one single stream to achieve 2.5GbE.

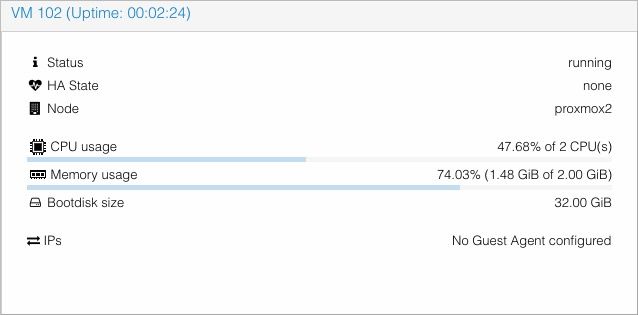
However, CPU utilization is pegged at around 100%. This is expected, since we have two NICs that are sharing one single core for IRQ, instead of having Proxmox to facilitate the data transfer.
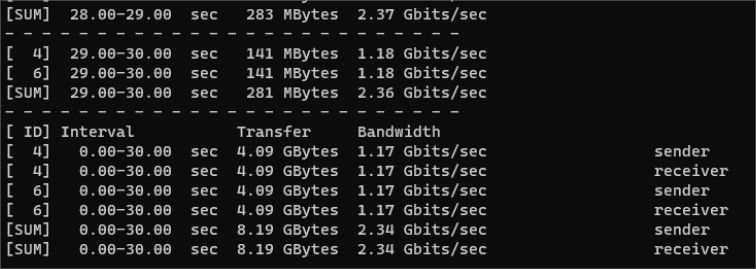
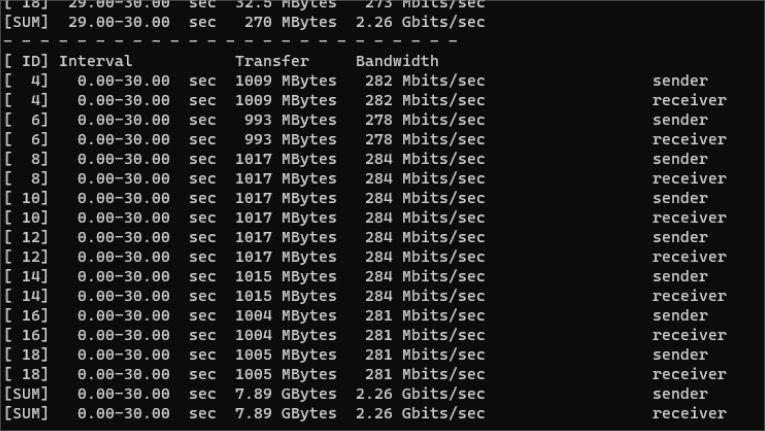
So I tested sending two streams, it looks like throughput is the same at 2.5GbE speeds, and CPU usage is still hovering around 100%.
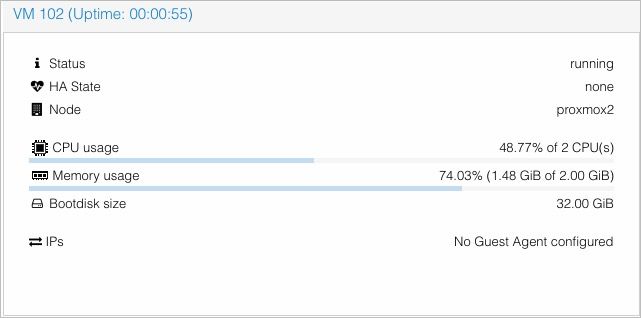
After provisioning one additional CPU core to the VyOS VM so that each NIC gets its own core for IRQ, the CPU utilization dropped to about 50% while sending two streams.
Furthermore, it doesn’t look like sending more streams would require more CPU resources. I tried sending eight streams, and CPU usage was steadily hovering around 50%. This NIC didn’t let us down, holding steadily at 2.5GbE speeds.
Conclusion
As I mentioned earlier, this NIC is for those who have an excess of M.2 slots but can't find a practical use for them. To be honest, if you have an available PCIe x1 slot, that should be your go-to choice for adding an NIC like this, since it doesn't waste any precious PCIe lanes on a consumer motherboard. However, if you're building an SFF PC with only one x16 slot and need additional NICs, and you have a spare PCIe-based M.2 slot, then this NIC could be a helpful addition.
I'm optimistic that a PCIe 3.0 solution will become available that can utilize the interface bandwidth for a four-port card. Imagine a PCIe 3.0 x1 NIC with four 2.5GbE ports - it could revolutionize the prosumer soft router market.