![vGPU (SR-IOV) with Intel 12th Gen iGPU [Updated Jan 2025]](/content/images/size/w1000/2023/03/intel-12th-gen-core-1-16x9.jpg)
[Update 2025-01-25] The following guide has been updated to reflect some detailed steps and up-to-date info with Proxmox8.3 /Kernel 6.8
Contents
[Part I: Foreword]
[Part II: Prerequisite - Updated]
[Part III: Proxmox Host Installation - Updated]
[Part IV: Linux VM Usage - Updated]
[Part V: Windows VM Usage - Updated]
[Part VI: Linux LXC Usage - Jellyfin HWA (Breaking Change)]
[Part VII: Conclusion]
Part I: Foreword:
I’ve always dreamed about using my hardware as efficiently as possible. In today’s PC master race, it almost felt like we are only using less than 20% of what our PCs are really capable of. For example, Intel ships most of its CPUs with a built-in iGPU. Although not a 3D Mark champ, it still packs a punch when it comes to media decoding and encoding. Previously mentioned in my NAS build, I went with an Intel 12th gen i3-12100. It has an Intel UHD 730 iGPU which does wonders for media encoding and decoding, especially the support for AV1 decode, which is absent on all other GPUs on the market, other than the Intel ARC and NVIDIA RTX 40 series.
So naturally, I started looking for hacks that can enable me to virtualize this iGPU for various VM uses, such as Parsec on Windows guest VMs, and hardware accelerated media transcoding/decoding with Plex or Jellyfin.
This guide will walk you through all the necessary steps to enable Intel iGPU for virtualization by modifying the kernel and driver using DKMS, and create virtual functions to pass these virtual GPUs to VMs.
Special thanks to:
Strongz for this DKMS module that made it all possible (https://github.com/strongtz/i915-sriov-dkms)
Tteck for Proxmox Helper Scripts (https://tteck.github.io/Proxmox/)
Foxi (https://foxi.buduanwang.vip/virtualization/pve/2695.html/)
WARNING:
This guide is highly experimental. If you are trying to use this guide on your production machine, DON'T DO IT. Test it with a spare system first, work out all the kinks before you move on to your production environment. From my experience, even if it seems to be running fine, there could be a lot of instabilities that we just don't know about yet.
Part II: Prerequisite:
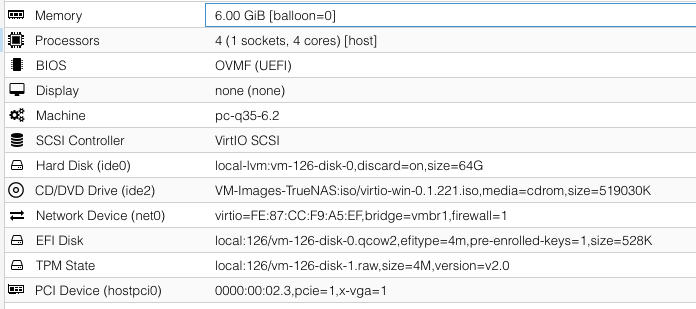
Motherboard: Turn on SRIOV and VT-d (IOMMU) in BIOS.
Proxmox Virtual Environment 8+
6.8 or newer Proxmox Kernel
You can update the PVE kernel to 6.8 using these commands:
- Disable enterprise repo.
nano /etc/apt/sources.list
Then use the following repos from Proxmox:
Alternatively, just use Tteck's Proxmox Helper Script (PVE 8 ONLY):
Part III: Proxmox Host Installation
After rebooting your system, do a kernel name check to see if 6.8 kernel has applied.
$ pveversion

pve-manager/8.3.3/f157a38b211595d6 (running kernel: 6.8.12-7-pve)
Now, we can proceed to prepare the environment for installing the driver.
- Install DKMS and build tools.
apt install dkms build-* proxmox-headers-$(uname -r) -y - Go to the Releases Page of the project, download the
.debpackage:
mkdir /opt/i915-sriov && cd /opt/i915-sriov

wget https://github.com/strongtz/i915-sriov- \
dkms/releases/download/2025.01.22/i915-sriov-dkms_2025.01.22_amd64.deb
3. Install the .deb with apt:
apt install ./i915-sriov-dkms_2025.01.22_amd64.deb
When that’s done, use the following command to verify the installation:
dkms status
The correct output should look something like this:
i915-sriov-dkms/2025.01.22, 6.8.12-7-pve, x86_64: installeddkms -uninstall i915-sriov-dkms/2025.01.22Now the DKMS module is loaded, we will need to edit GRUB to enable the virtual functions.
- Edit GRUB:
nano /etc/default/grub - Look for “GRUB_CMDLINE_LINUX_DEFAULT” line, and add the following:
intel_iommu=on i915.enable_guc=3 i915.max_vfs=7 - Your line could look like this:
GRUB_CMDLINE_LINUX_DEFAULT="intel_iommu=on i915.enable_guc=3 i915.max_vfs=7 iommu=pt quiet" - Update initramfs and grub:
update-grubupdate-initramfs -u
pve-efiboot-tool refresh - The third command is probably redundant but I am including it anyway.
- Install sysfsutils and configure sysfs.conf:
apt install sysfsutils -y
echo "devices/pci0000:00/0000:00:02.0/sriov_numvfs = 7" > /etc/sysfs.conf - Please note, this is assuming your iGPU’s PCI address is the same as mine (0000:00:02) and most likely it would be. If not, you will have to change the command appropriately. If you are not sure which address your iGPU is assigned to, you can use the following command to verify:
lspci | grep "VGA" - If you have a discrete GPU installed, you may see two or more outputs. Identify the Intel iGPU address, and use that for the command above.
Part III.a: Download iGPU Firmware (Optional)
- Check if the firmware exists on your system:
ls /lib/firmware/i915/tgl_guc_70.1.1.bin - If the output is empty, download the firmware from here:
wget https://mirrors.apqa.cn/d/proxmox-edge/intel_gpu_sriov/i915-firmware.tar.gz - Then:
tar -xf i915-firmware.tar.gz - Finally, copy to the firmware folder:
cp ./firmware/* /lib/firmware/i915/ - Note: this is the firmware for 12th/13th gen iGPUs (Alder Lake, Raptor Lake). If you are using 11th gen, you have to source your own firmware.
- Reboot your system
reboot
Part III.b: Verification
After a system reboot, check dmesg to see if your iGPU has virtual functions enabled, or use the following:
lspci | grep VGA
You should see a similar output under PCIe address your iGPU is assigned to:
00:02.0 VGA compatible controller: Intel Corporation Device 4692 (rev 0c)
00:02.1 VGA compatible controller: Intel Corporation Device 4692 (rev 0c)
00:02.2 VGA compatible controller: Intel Corporation Device 4692 (rev 0c)
00:02.3 VGA compatible controller: Intel Corporation Device 4692 (rev 0c)
...
If you don't see any VFs, do dmesg | grep i915 to see what kind of error messages you're getting.
If you can see the VFs are enabled, congratulations! Now we can move on to setting up the hosts to use these virtual GPUs.
Part IV: Linux VM Usage
These steps are verified with Ubuntu 24.04.1 LTS with kernel 8.3.
If you are using the VFs in Linux VMs, you are in luck, because you have already practiced every necessary steps before in the Host setup. Simply put:
apt install dkms build-* linux-headers-$(uname -r) linux-modules-extra-$(uname -r)

apt install ./i915-sriov-dkms_2025.01.22_amd64.deb- When it comes to modifying the command line defaults, blacklist the
xedriver that Ubuntu 24.04 comes withmodule_blacklist=xe.
lspci -nnk to verify which driver is being used by the VF. Also, check dmesg | grep i915 to see the error output.xe driver by adding blacklist xe to /etc/modprobe.d/blacklist.conf- Use the driver module to enable GuC submission instead of linux kernel command line:
echo 'options i915 enable_guc=3' > /etc/modprobe.d/i915.conf - Update GRUB and initramfs, then shutdown the VM.
- Now you can add the VF, disable VM's emulated graphics, and start up the VM again to see if everything's working.
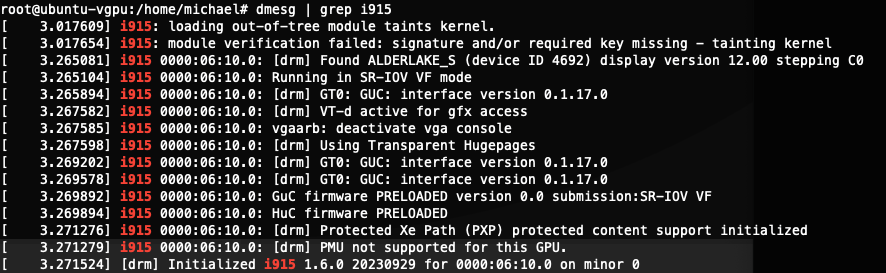
To verify the Guest VM has been configured correctly, do dmesg | grep i915, you should see an output that is similar to this:
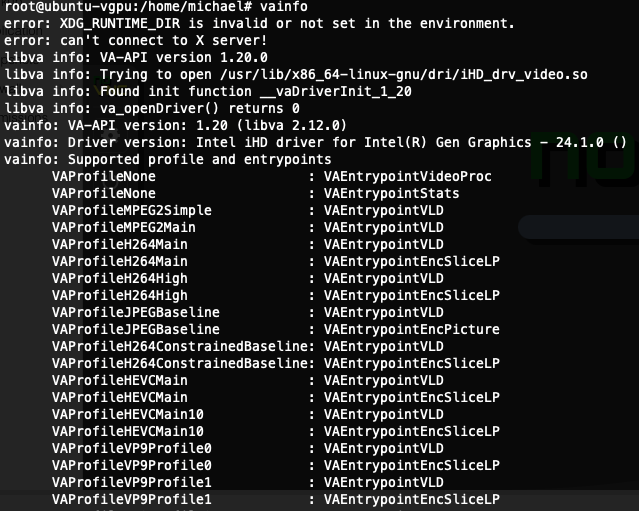
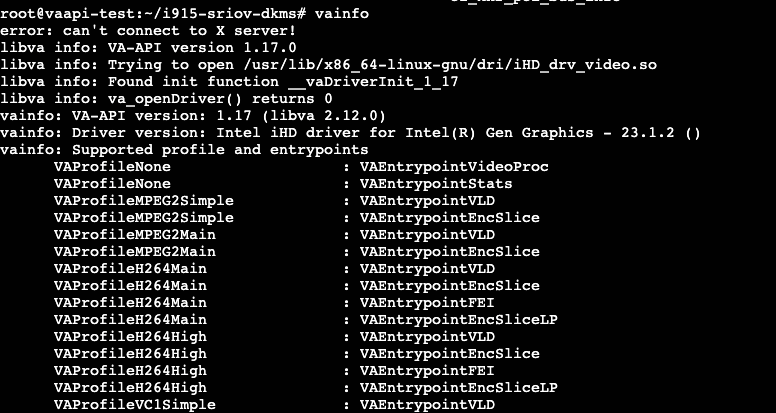
Furthermore, we can verify by installing vainfo. Here's a sample output:
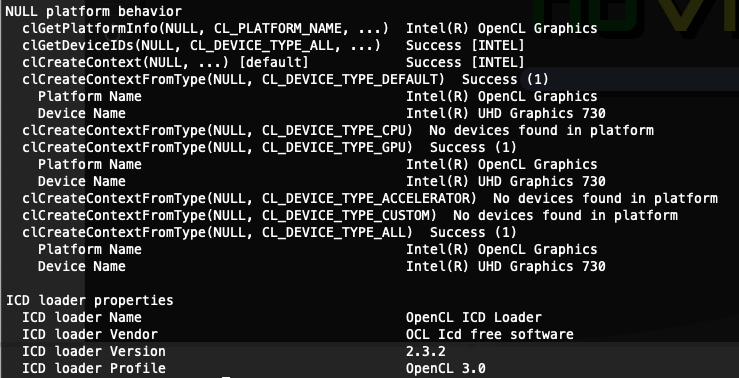
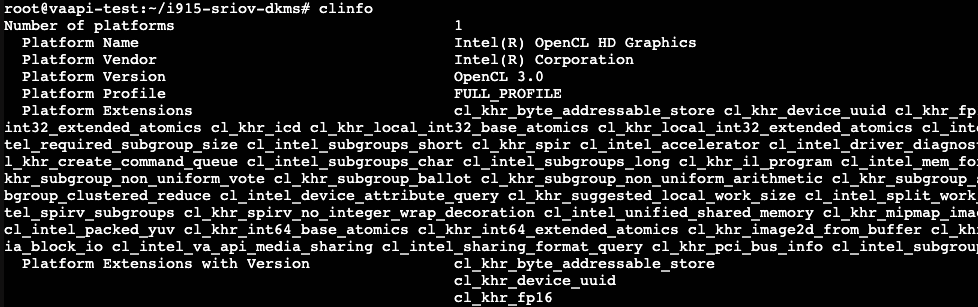
And - last but not least, clinfo. Before you can use OpenCL, you need to install Intel's OpenCL driver with apt install intel-opencl-icd. Then, install clinfo with apt install clinfo.
Finally, if all things went well, you should be able to use clinfo to see a similar output to this:
That's all there is to it. Have fun!
Part V: Windows VM Usage
Extract Graphics EFI Firmware
- Download UEFITools (
UEFITool_NE_A68_win64for Windows. They supply Linux and Mac binaries, too) - Download BIOS for motherboard (I suspect any motherboard BIOS would work as long as it is for Alder/Raptop Lake Desktop Platform)
- Unzip BIOS
- Use UEFITools (Run as Admin) to load the BIOS (usually
.cap) - Go to
Action - Searchor use keyboard shortcutctrl+Fand search for Hex string49006e00740065006c00280052002900200047004f0050002000440072006900760065007200 - Double click the search result in the search column, it will highlight the item found within the BIOS.
- Right click on the highlighted result and
Extract body... - Save the file, file name and extension do not matter. I used
intelgopdriver_desktopand it would save asintelgopdriver_desktop.bin. - You can also compare the checksum of the file:
- Windows Terminal Command:
Get-FileHash -Path "path-to-rom" -Algorithm SHA256 - For desktop with UHD730 and UHD770:
131c32cadb6716dba59d13891bb70213c6ee931dd1e8b1a5593dee6f3a4c2cbd - For ADL-N:
FA12486D93BEE383AD4D3719015EFAD09FC03352382F17C63DF10B626755954B
- Windows Terminal Command:
- You'll need to copy this file to
/usr/share/kvmdirectory on Proxmox host. I uploaded it to a NAS and downloaded it withwget.
Windows VM Creation
- When setting up the machine, set
CPUashost.
Shift+F10 at the first setup screen and type OOBE\BYPASSNRO. The VM will reboot, and you can choose "I don't have Internet" option to set up a local account. Alternatively, you can remove the network device from the Windows VM.- When the setup process is done and you are at the Desktop, enable Remote Desktop and make sure your local account user has access. You can shut down the VM for now.
- When the VM is powered off, edit the configuration file:
# Passing the 02.1 VF, specify the romfile. ROM path is relative

hostpci0: 0000:00:02.1,pcie=1,romfile=Intelgopdriver_desktop.efi,x-vga=1- In the
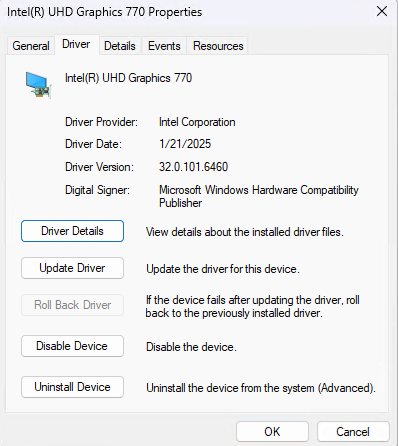
Hardwaretab, setDisplaytonone. - Now you can start the VM again. You won't be able to access it with console, so your only way in is Remote Desktop. Once you are in, download the graphics driver from Intel, any version should work.
- During driver install, you may experience black screen when the actual graphics drivers are being installed and applied. This black screen will persist until you restart the VM. My advice is give it a few minutes to do its thing. You can make your best judgement by looking at the VM CPU usage in Proxmox.
- After rebooting, connect with RDP once again. Go to Device Manager and verify the result. You should see the Intel Graphics is installed and working.
For short:
- Machine type must be q35 with OVMF BIOS (UEFI boot), CPU Type set to "Host".
- Boot the VM with default Proxmox emulated graphics, then enable Remote Desktop.
- Shut down the VM, remove the Proxmox graphics (set it to "none"), then edit the VM configuration file add the vGPU, then specify a path to pass the EFI firmware.
- Boot the VM, RDP to it, then install Intel official drivers. I am using
gfx_win_101.6460Intel Arc driver directly downloaded from the Intel website, without the dreaded “Code 43” error.
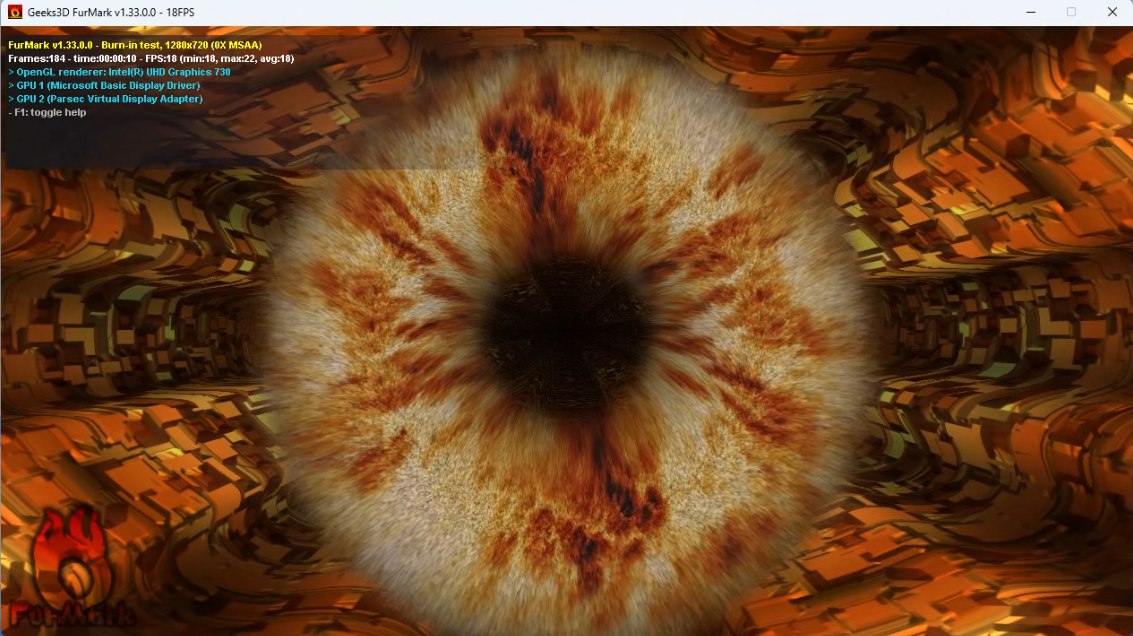
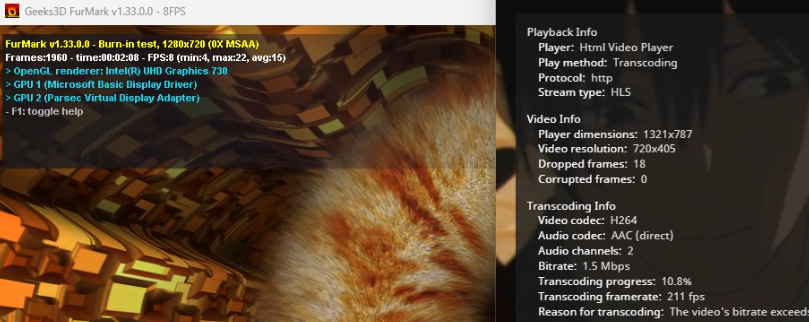
Running Furmark. Like I said, this iGPU is not going to win any benchmark trophies.
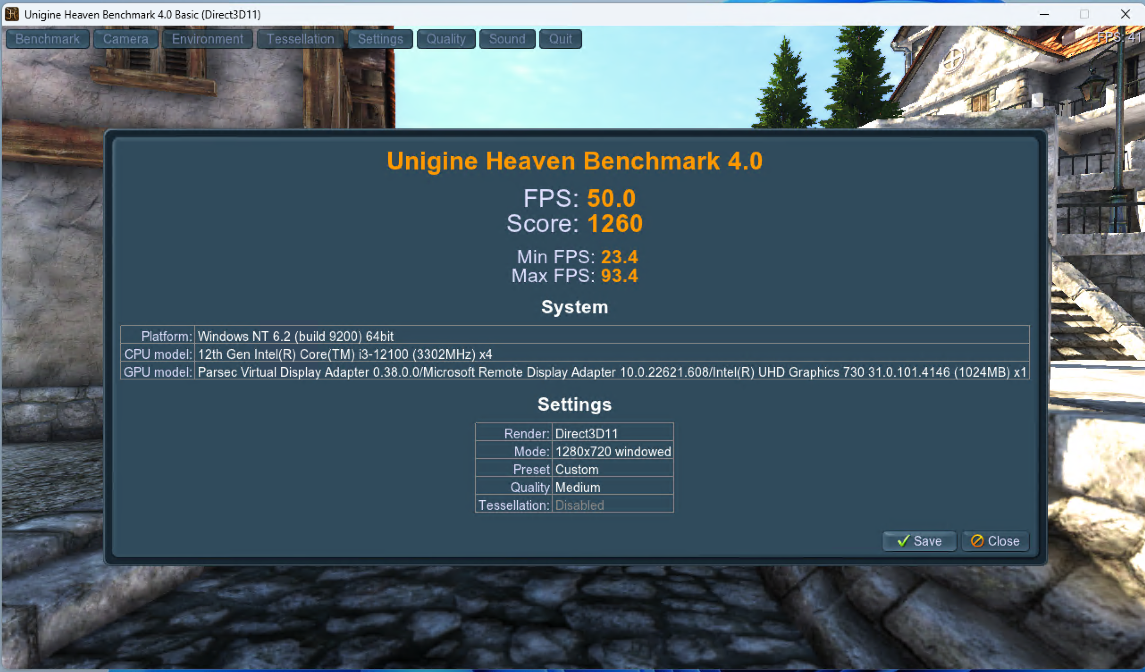
Running Unigine Heaven. 720p, Low Preset. iGPU is pegged at 100%. Parsec encode has slowed down significantly, too. From less than 4ms per frame up to almost 10-12 ms per frame.
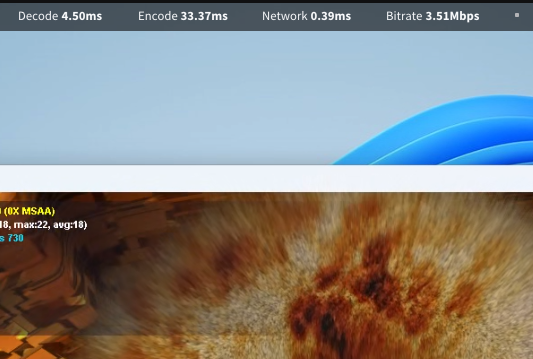
Let's throw Jellyfin Hardware Transcoding into the mix, with Furmark and Parsec running on the Tiny11 VM:
Part VI: Linux LXC with Jellyfin
https://github.com/jellyfin/jellyfin-ffmpeg/releases/tag/v6.0-8
The version above should be a fix. Just download the release and install it, replacing the "old" one that comes with the LXC or direct install.
If you choose to apply this fix, when mapping the virtual function, map them as the same as the root device. Say if you want to map the 'card2' and 'renderD130' (these two must match. 'card' starts from '0' and 'renderD' starts from '128'), then map them to 'card2' and 'renderD130' in the LXC, the same as root.
One important patch about the Jellyfin-FFmpeg is that it will iterate through the 'card' and 'renderD' numbers to find the VA-capable device, while vanilla FFmpeg does not do this, so if you are using vanilla FFmpeg, do map the device to 'card0' and 'renderD128'.
The Tteck Jellyfin LXC would no longer work under this new configuration (Unless the newer Jellyfin-FFmpeg is used, see above). So we have to start with a vanilla LXC. In this example, I used Ubuntu 22.04 and did a distro upgrade to 23.04. Also, this is a priviledged container that has root access.
After the vanilla LXC is setup, time for some configuration.
- Out of all the VFs that you have, pick one. Let's say we are going with No.4, which has the PCIe Address of 02.4 (02.0 being the Primary Function, which is the iGPU itself. Never pass this to any VM).
- In Proxmox console, type
ls -l /dev/dri/by-pathto find out which devices are associated with your VF. In this example, I can see VF4 is associated withcard4andrenderD132.

3. Then, edit the Jellyfin LXC container config. nano /etc/pve/lxc/<JELLYFIN LXC ID>.conf
4. Comment out these two lines: lxc.cgroup2.devices.allow%3A c 29%3A0 rwm lxc.mount.entry%3A /dev/fb0 dev/fb0 none bind,optional,create=file
5. Edit this line: lxc.cgroup2.devices.allow: c 226:4 rwm where the '4' in '226:4' is the VF number you have picked. If you picked '1', then it should read '226:1'.
6. Edit this line: lxc.cgroup2.devices.allow: c 226:132 rwm where the '132' in '226:132' should be the renderD number we obtained earlier with ls -l /dev/dri/by-path
7. Edit this line: lxc.mount.entry: /dev/dri/card4 dev/dri/card0 none bind,optional,create=file where the first argument /dev/dri/card4 is the VF you picked, the second argument maps it to card0 in the LXC container. I've tried leaving it the same as the host but after trial and error, only mapping it to card0 will work.
8. Edit this line: lxc.mount.entry: /dev/dri/renderD132 dev/dri/renderD128 none bind,optional,create=file pretty straight forward, we are mapping renderD132 from the host (Proxmox) to renderD128 in the LXC container.
SAMPLE CONFIG, FOR REFRENCE ONLY
arch: amd64
cores: 2
hostname: vaapi-test
memory: 512
net0: name=eth0,bridge=vmbr0,firewall=1,gw=[],hwaddr=[],type=veth
ostype: ubuntu
rootfs: local:123/vm-123-disk-0.raw,size=12G
swap: 512

lxc.cgroup2.devices.allow: c 226:4 rwm
lxc.cgroup2.devices.allow: c 226:132 rwm
lxc.mount.entry: /dev/dri/card4 dev/dri/card0 none bind,optional,create=file
lxc.mount.entry: /dev/dri/renderD132 dev/dri/renderD128 none bind,optional,create=file

## the last four lines are what matters the most, they map the VF to the LXC as main GPU
9. Save the file, reboot the container, and install FFmpeg:
apt install ffmpeg
10. Then, install vainfo, clinfo, and intel-opencl-icd. In some cases, you would also need the intel-media-va-driver-non-free package
apt install vainfo clinfo intel-opencl-icd intel-media-va-driver-non-free11. You can examine the output of vainfo and clinfo to see if the VF is being identified correctly:
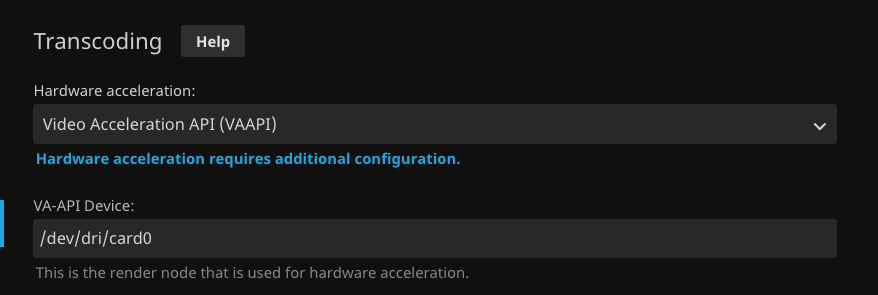
12. If the outputs above are similar to what I have shown, chances are you are good to go. Last but not least, install Jellyfin via it's official source, and set the Jellyin FFmpeg path to the output of which ffmpeg, most likely it would be /usr/bin/ffmpeg. Also, set the harware acceleration to "VAAPI" and use /dev/dri/card0 as the VAAPI Device.

13. To test if the device can be used by FFmpeg, you can use this command to initialize the device:
ffmpeg -v verbose -init_hw_device vaapi=va -init_hw_device opencl@va
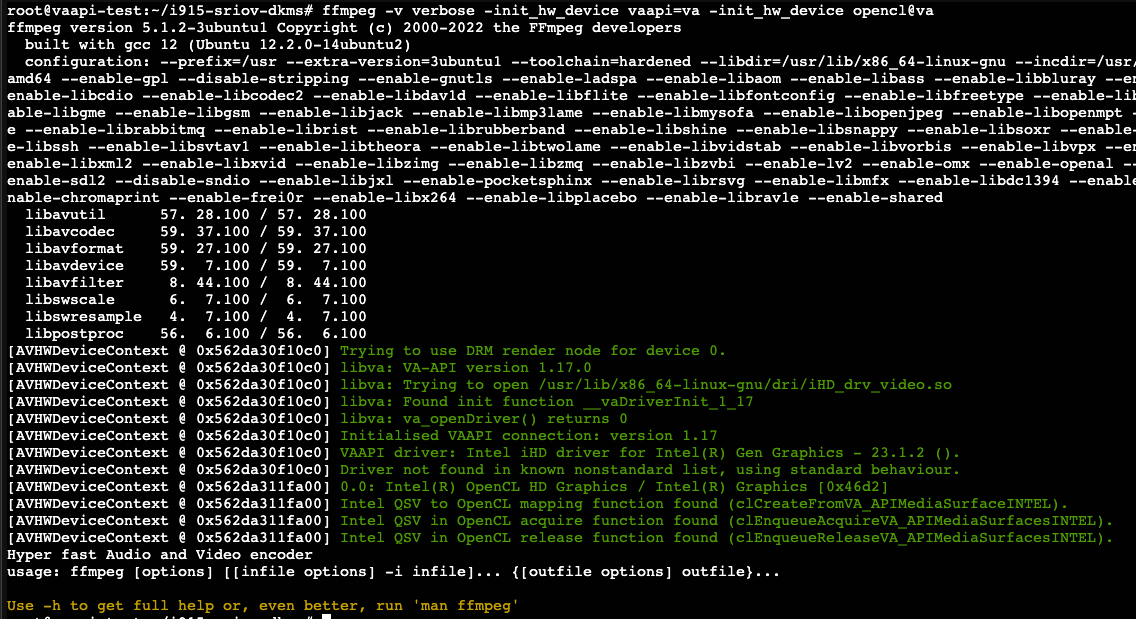
Additionally, this is the output I get if I run the command with Jellyfin-FFmpeg:
/usr/lib/jellyfin-ffmpeg/ffmpeg -init_hw_device vaapi=va
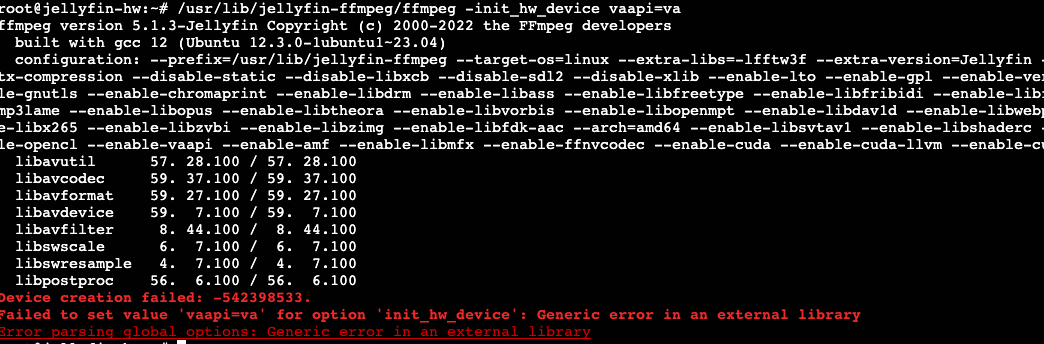
So, simply put, use the official FFmpeg instead of the one shipped with Jellyfin.
Part VII. Conclusion
With some tweaks and commands, we successfully used the iGPU's virtual functions in both a Windows VM and a Jellyfin server. I am really glad that I didn’t cheap out on the $15 difference by getting the i3-12100 for my NAS, instead of the i3-12100F. However, after discovering the UHD 730 on this CPU only has one media engine, I do have some buyer's remorse of not going up to i5-12500 for the UHD 770 iGPU. I mean, this iGPU takes up none of the PCIe slots, and provides a really nice functionality that we can only dream on with other higher end graphics cards. Granted, by using vgpu-unlock, we can virtualize an NVIDIA card (Ampere and up excluded) as well. However, for my application, the simplicity of Intel iGPU is hard to beat.
I am expecting an Intel ARC A380 in the next couple of days. I will try to use this DKMS module to see if I can get the A380 to enable virtual functions as well. Until then, good luck tinkering. Also, I am putting together a test bench to see how the iGPU performs under virtual functions versus just single PCIe passthrough. Stay tuned.

UPDATE 2023-03-06: The Intel Arc A380 is a NO GO. The PVE kernel is just not new enough to include the correct i915 driver for the A380. Even if it does, say, when Proxmox get Linux Kernel 6.2, Intel has confirmed that Alchemist WILL NOT SUPPORT SRIOV.